Showing posts with label chalk paint. Show all posts

Monday, March 21, 2022

Antique Desk Makeover

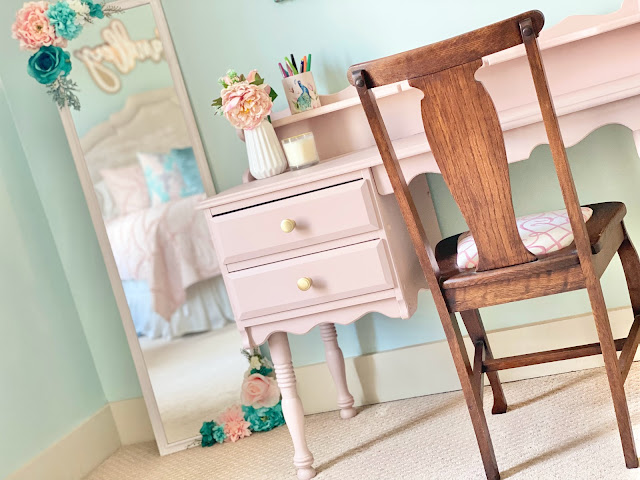
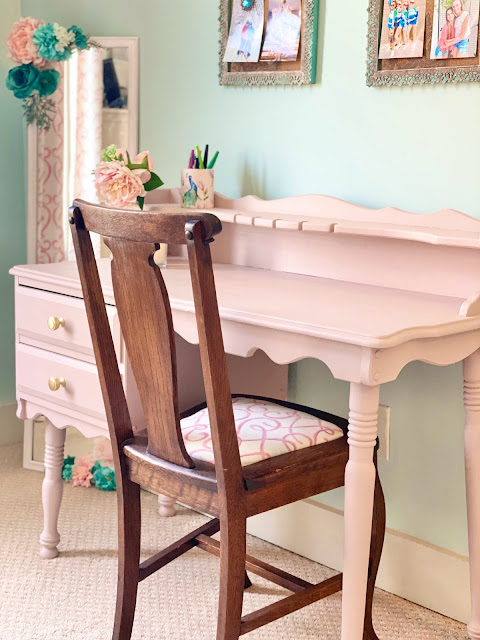
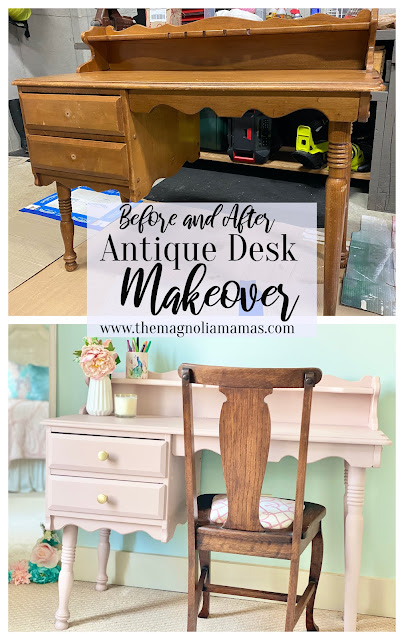
A few months ago my mom asked if I wanted to have an antique desk that belonged to my Great Aunt for my daughter's room and I jumped at the chance! 

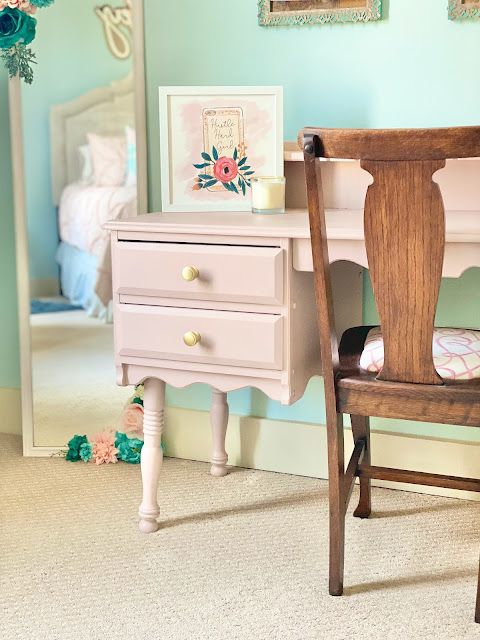
My mom had it for a long time, but wasn't going to have a space for it anymore.  I loved the shape and detail of it, but knew I wanted to paint it to match my daughter's room.  

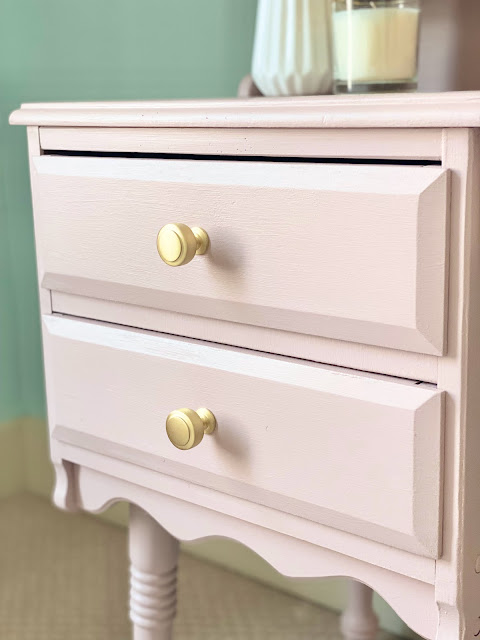
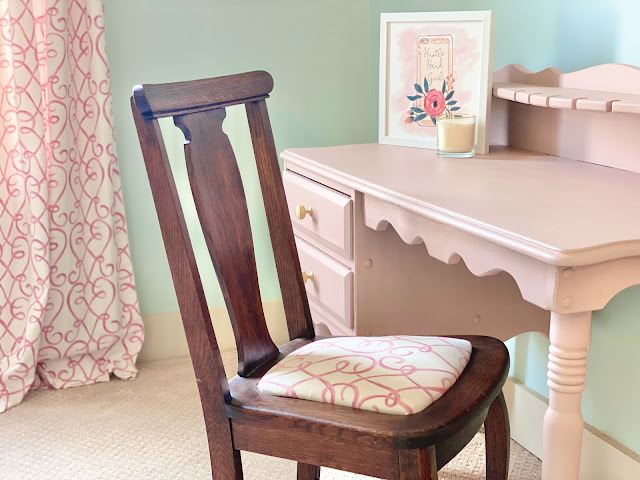
I used Dixie Belle Paint in Tea Rose and feel like it was the perfect shade of pale pink to coordinate with her room.  I've used Dixie Belle paint before and love the ease of it! No need to sand or prime the furniture. You literally just wipe it down to make sure it is free of dust and dirt and then paint on a few coats.  The coverage is really great and they have so many great colors.  I topped it off with the Dixie Belle clear coat and then added these new brushed brass knobs. 


I also got this antique chair and recovered the seat of it in the same fabric as her curtain panels. 


I'm so pleased with how it turned out and just love how it looks in her room!  This post is totally not sponsored, but if you are looking to paint any furniture I would definitely check out the Dixie Belle line!  

Follow us on Pinterest HERE.
Follow us on Instagram HERE.
Follow us on Facebook HERE.
Follow us on Twitter HERE. 

Wednesday, March 22, 2017

Spring has Sprung {Spring and Easter Decor}

On Monday we celebrated the first day of spring and yesterday Atlanta decided to skip straight to summer.  It was sunny and hot and made us start dreaming of pool days and beach vacations.  We all put on our shorts and while my kids enjoyed popsicles on the porch I pulled out all of our Easter and spring decorations.  

On the front porch are my DIY Easter yarn wreaths. These might be my very favorite front door wreaths that I hang throughout the year and I always get excited when it is time to hang them.  


The bunny, the felt flowers, the lace ribbon and the burlap color wreath get me every.single.time.  You can see the full post with the tutorial of how I made the wreaths HERE.


On the side door on our porch I have our Easter egg wreath that was a grocery store clearance purchase one year.


Inside I added little touches here and there like this little bunny to the chalk painted washstand that sits in our entryway...


...and these glittered Easter eggs along with an antique serving dish that belonged to my grandmother. The colors are perfect for Easter and complement each other so well! 


Also in the kitchen I updated my mini chalkboard sign and put out some spring scented candles.


And I've really been enjoying the fresh flowers I picked up from Trader Joes last week. I had to cut and rearrange them once already, but they still look great and I love the color and spring feel they add to my kitchen.


I also have two boxwood wreaths that I got for Christmas from my mom. I had originally planned to put them on my front doors, but that didn't work out as planned.  The quality of the wreaths is fantastic, but they are better for indoor use.  Our porch is covered, so they weren't getting wet, but when it rained the humidity was just too much and the color was running/dripping, so I decided to use them indoors instead. I have one over the hood vent in our kitchen and the other is hanging on the antique hutch in our keeping room. 


This year I was excited to add a few new pieces to my spring stash from Oriental Trading.  I have been searching for a decorative bird cage, but hadn't been able to find something that was the correct size/style I wanted.  I finally found this one and I loved the design. The size was just what I was looking for. When it arrived my kids were all excited because they thought it meant we were getting a bird.  As a pet. Um, no. I had to explain to them it was just for decoration and we wouldn't be adding any more pets to our family...especially those with feathers.


I really liked the bird cage, but decided that the white paint on it was a little too white and that I preferred a more distressed and antique look.  I just happened to have a small jar of chalk paint waiting for a project like this so I pulled it out and got to work.


I've used chalk paint a handful of times before, but never on metal so I was curious to see what the coverage would be like.  It took about 3 coats, but looked great when it was done.  This picture was taken after the first coat.


After all the coats of paint I put a dark wax on it and was totally in love with the final product. 


I put the completed project on my screen porch and think it just screams spring out there.  I love it so much!


Along with the bird cage I added some pretty spring flowers in none other than a glitter mason jar.  I also added this adorable little bunny (also from Oriental Trading) and thought it just complete the spring touches to my porch.  For the price it can't be beat and is made of resin so it's a great solid piece that goes so nicely with the rest of my Easter accessories.


Now, if I could just keep it all clean through the crazy pollen season we are about to experience, I'd be happy!

 photo cbsignature.jpg

Follow us on Pinterest HERE.
Follow us on Instagram HERE.
Follow us on Facebook HERE.
Follow us on Twitter HERE.


***Thank you to Oriental Trading for providing these products for my review.  As always, all opinions are my own.***

Wednesday, January 18, 2017

Repurposed Changing Table {Dixie Belle Paint}

Remember a few weeks ago when I was sharing my goals for the New Year?  One of those was to tackle some house projects that have been on my to-do list and I'm happy to report I completed one last week!   

When my parents were cleaning out my grandmother's house and asking who wanted what furniture, I claimed an antique changing table because I knew I wanted to use it as a shelf and I had just just the spot for it in our playroom.  My girls love to play school so we have a lot of "teacher stuff" in the playroom.  Before this DIY painting project it was housed on this old shelf that probably was mine from from college.  Such a mess and I didn't even pick up for this picture.  #RealLife y'all...messes and unorganization and all.  


This was one of the lessons they had written on the white board for their students.  


I knew that this changing table/shelf would provide so much more space so I was excited to spruce it up a bit to make it fit the space.  


The lovely folks at Dixie Belle paint asked if we would be interested in trying some of their paint and knowing I had this project on my to-do list, I jumped at the chance.  I had never tried Dixie Belle paint before, but had success with a few other painting projects and was excited to give it a whirl.

They have such a wide variety of colors, but I chose Barn Red since our playroom has red accents and I couldn't wait to get started.  I knew the spindles would take me a while, and they did, but it was worth it!


I was so impressed with the coverage of the Dixie Belle paint.  It dries incredibly fast and although I really only needed to do one coat, I went back over a lot of the piece with a second coat just to be sure when it dried it would all look even. The Dixie Belle paint can be used on almost any surface and it worked out great because the main part of this was wood, but the flat part was laminate and the coverage worked the same for both types of surfaces.


The next day I distressed it a bit using a sanding block and then used their Clear Coat Satin Finish to seal the piece.


I learned that a little goes a long way.  It was best to work in small sections and I used a damp brush for the application.  


After letting it dry I was so excited to move it in the playroom and get everything organized!  


I found these baskets at Target and they came in several different sizes so they were perfect for holding all of their teacher things.


The kids were chomping at the bit to get started playing school and really loved their classroom set up in the corner of the playroom.


I was able to hold them off for just a couple of minutes so that I could get a few pictures, and then they were ready to get their lessons going.


I was so impressed with the Dixie Belle paint that now I can't wait to do some other painting projects.  There are a few other things hanging out on my to-do list that I'm now excited to get started on!  
 photo cbsignature.jpg

Follow us on Pinterest HERE.
Follow us on Instagram HERE.
Follow us on Facebook HERE.
Follow us on Twitter HERE.

Monday, June 20, 2016

Wooden Monogram on Burlap

Happy Monday!  Today I wanted to share the second part of my Chalk Paint® project.  I shared the first part on Friday HERE and showed how I transformed my antique washstand to a beautiful Duck Egg blue and moved it from a guest room to our foyer.


I knew I wanted a wooden monogram or initial hanging above this piece and had the thought to somehow attach it to a burlap covered canvas.

I found Julie's Woodcrafts who is local and designs and makes wooden initials, monograms and other types of woodcrafts.  I was very pleased with her selection and the price was much more affordable than others that I had found online or in stores.  I was able to pick mine up, but she also has an Etsy shop and can ship to you!


I decided to go with a single initial because I needed it to be narrow enough to fit between the top of my washstand.


She recommends staining or spray painting her pieces, depending on the type of material used, and I normally would have spray painted it, but I wanted it to match my washstand exactly so I used the Chalk Paint by Annie Sloan on it.


After I was done painting the initial I used a light wax to seal it and then went over the edges very lightly with a dark wax to give it a worn look.  I was a little nervous because I didn't want it to change the color too much since I wanted it to match the washstand.  I love how it turned out though and think it add a little something extra to it.


Next I set out to purchase a canvas and burlap to cover it. I was going to just stretch the burlap over the canvas and use a staple gun to attach it at on the back, but then as I was walking down the aisles at my local craft store I found this!


 A stretched burlap canvas already done for me and in the exact size I was needing. I just skipped the step of having to do that myself and for about the same price bought the one that was already done.  If anyone is interested in this project, I found the same product by a different brand on Amazon HERE.

I was a little stumped about how to attach the initial to the burlap.  First I tried Gorilla Glue that my husband swears by for everything, but it wasn't working for this.  Perhaps I just didn't let it dry long enough, but I was on a limited time schedule.  Next I tried hot glue, but it dried so fast I wasn't able to get glue all over the back and flip it over on the burlap in time.  I wished I had E6000 on hand because I know that would have worked.  I used to use that for everything that needed  something strong to hold and it goes way back to my dance days.  It's what my mom used to attach rhinestones to my costumes.  I really wanted this project done ASAP though so I used hot glue and just worked in sections. I glued the top part first and had it attached well.  Then I sort of worked my way around the initial, sticking the tip of the glue gun between the initial and the burlap to glue each section until I felt like it was going to hold.  This is what the back looked like after it dried. As I was gluing I made sure to really push and hold the burlap to the wood.


I added a picture hanger to the back of the canvas and was ready to hang.


I feel like it fits perfectly between the top of the washstand and I love the way it completed this little space in my foyer.


Now I'm trying to decide what my next house project will be.  Curtains for the guest room, painting another piece of furniture, or more wall decor?  It's constantly a work in progress, but I love seeing the before and after on fun projects like this!

 photo cbsignature.jpg

Follow us on Pinterest HERE.
Follow us on Instagram HERE.
Follow us on Facebook HERE
Follow us on Twitter HERE.

**This post contains affiliate links.**

Related Posts

Related Posts Plugin for WordPress, Blogger...