Showing posts with label crafts. Show all posts

Wednesday, February 8, 2023

DIY Valentine's Day Pillows

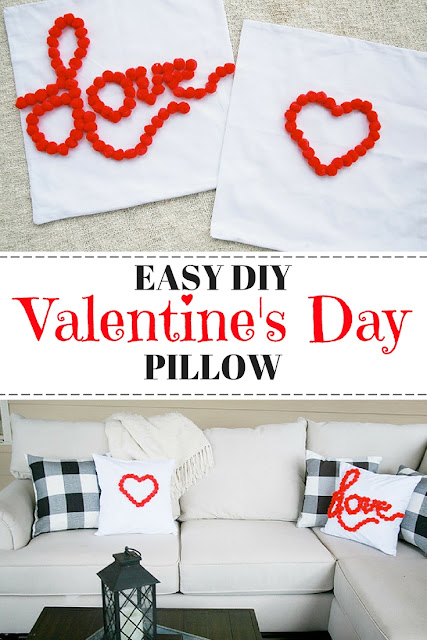
We are self-proclaimed throw pillow addicts. We have them for every season, every holiday, and a multitude of colors. Our view is life is short, and you can never have too many throw pillows. February presents itself on the calendar, and we have so many throw pillow possibilities – the biggest being Valentine’s Day. Now this little addiction of ours can get expensive, but we’ve found the trick to keeping our habits satisfied without breaking the bank on all that fluffy cuteness. We created these adorable Valentine’s Day pillows for less than $5! That’s right – all your throw pillow dreams just came true.


This inexpensive DIY is super easy, and (bonus!) easy to store when done! What’s not to L-O-V-E?


Needed supplies:
– 2 Pillow covers (Or however many you like! For the love of throw pillows – get a little crazy!)
– 4-5 packs of red poms
– Hot glue 
– pencil


Instructions:
1: Before you begin your project, iron your pillow covers. It’s easier to do this before you start the project than after you’ve adhered your design.
2: Plug in your hot glue gun and set aside approximately 3-4 extra glue sticks for use throughout the project.
3: While your glue is warming up use this time to trace the designs you desire on your pillows with a pencil. For this project we cut out a heart we printed online and free handed the word “love”. The possibilities are endless though!


4: Begin tracing along the lines of your designs with the hot glue. Go slowly and place down the red poms as you go. Repeat until complete.


5: Once cooled remove any extra glue.
6: Insert pillow into pillow cover. (With that little throw pillow addiction we know you have plenty of extra in storage. Just pop one in and no one will ever know last season’s Christmas pillow is this season’s Valentine’s Day pillow.)


7: Display and enjoy!

The best part about this little decor project, aside from it taking only about five minutes to complete, is that once the holiday has passed we can simply unzip the Valentine’s Day pillow cover and easily store it for next year!


Come spend the day with us on:


Friday, December 13, 2019

DIY Stamped Books

Earlier this week I shared about our Girls Craft Night (you can see the post HERE) and promised I would share the details about these DIY stamped books.  


I have seen similar products sold online or in local boutiques and always loved them, but didn't want to spend the money on them.  Well, I decided that I could probably make these myself and it was seriously the EASIEST project ever. 


Materials: 
Paperback books 
Stamps (I used this set
Baby wipes 
Twine/ribbon/string 
Scissors 
Greenery sprigs 
Wire cutters 

The first step is to find the books.  You may have a bunch of old books laying around your house that you could use for this, but if you want to purchase cheap paper back books the best place is the Dollar Store!!! 


I didn't even know they had books, but they do. Goodwill is another great option, but their books are between $2-3 and the Dollar Tree books are obviously only $1.  I stocked up on all that they had and actually made a trip to another Dollar Tree to grab some more. The only thing you need to make sure of is that they are thick enough to be able to fit the letter stamps.  

Once you have your books the next step is to literally rip the covers off. I know this seems bad and at first I felt horrible tearing off the covers. However, that gives you the rustic/farmhouse look and makes the spines blank to be able to stamp.  You can also rip off a few pages until you find the title or dedication page. Just something that is pretty plain to be on the top of your stack.


Now you are ready to start stamping. I found tons of inspiration on Pinterest and also just Googled "hand stamped books" to get some ideas. You could do anything from family names and holiday sayings to Bible verses or hometown locations.


We decided that we liked the look of using all lowercase stamps so that is what we used. I also found it helpful to write down what you are going to put on the books unless you are great at spelling backwards. I am not, especially after a glass of wine, so I wrote it down and then was able to work backwards...lining up all of the ends of the words with the end of the books.


The stamping was simple.  One tip I would share is that after getting the stamp wet with the ink from the stamp pad, wipe around the edges with a baby wipe or wet paper towel to get the excess ink off.  You just want to make sure the ink is on the actual letter, but not all around the letter or it will show up when you stamp the book.


After all the stamping is done, line up the books, wrap the jute twine around a few times and tie in a bow. We cut little pieces off of the greenery spray to tuck into the twine and just add a little something extra to the project.


This was such an easy project and so fun to make!  I feel like these stacks would be great as a personalized gifts for hostesses, a fun addition to a Christmas gifts, or just to make for your own home!


Follow us on Pinterest HERE.
Follow us on Instagram HERE.
Follow us on Facebook HERE.
Follow us on Twitter HERE.

Wednesday, January 23, 2019

Master Bedroom Makeover: Part 2

A few months ago, I decided it was time to update our Master Bedroom. Our bedroom was looking sort of sad and neglected compared to some of the other rooms in our home. I went to one of my favorite stores and shopped my heart out for some new bedding and decor, but even though I was happy with the results it still didn't quite look as "finished" as I had in my head.


After the New Year, Mr. Cute surprised me by saying he was taking a week off from work to stay home and wanted to knock out some home projects. We made a list of ideas and prioritized what we wanted to do. I was surprised when he picked my idea for our Master Bedroom out first. He looked at my idea and said he could create the trim work I envisioned in just a few days. I was so excited!

Our bedroom is such a large space, and I think what bothered me was that the walls were just so plain. I'm a huge sucker for trim work and almost every room in our house now has some (thanks handy husband!), but our sad little bedroom was left out along the way.

We chose to do a taller Board & Batten around the room, and Mr. Cute put his carpentry skills to work.

Within two days he had the trim completed, and within three caulked and painted. I was so impressed! It totally transformed our entire room!


As he was doing all the hard labor, I called up Carrie Beth to help me grab some of the finishing details. She was working on her closet/office makeover so I thought we could tag team our efforts and bounce ideas off one another. Not to mention shopping with your bestie is just so darn fun.


We found the softest, dreamiest bedding for a shockingly inexpensive price. 


And after two trips we got the throw pillow situation just right. 


And while team Magnolia efforts were focused on trim work, painting, and throw pillow hunting by day, at night I was scouring the Internet for a set of new chairs. Our bedroom already had a little sitting area set up, but I knew to make the room complete we'd have to update that a bit too. In my mind I had leather wing backs, but then I stumbled upon these gorgeous recliners and knew they would be perfect.

They coordinate perfectly with the storage bench at the end of my bed, and I know if we ever rearrange our furniture in the future, I can utilize all three together in a different space if needed.


We found this round side table during our shopping trip and I knew it was the perfect size for the space. Bonus that it matched my bedroom furniture perfectly. It comes in several colors, and almost did something to mix it up, but decided to have it be uniform to the rest of the furniture.


We have a few more minor touches to add to the room, but for now I'm loving our new master bedroom!


ALL IN THE DETAILS

It was so fun pulling this room together. Here are all the details in case you are interested in doing something similar or saw something you liked. 


Come spend the day with us on:
Instagram | Pinterest | Facebook | Twitter |

Thursday, April 26, 2018

DIY Anchor Pallet Wood Sign

Easy DIY Anchor Pallet Wood Sign


This DIY anchor pallet wood sign might be one of the easiest projects we have ever done! Mostly because it wasn't a long thought out project. On Friday night I was sitting in our office and glanced over at a box that had been leaning against the wall for well over the year. I was sipping on wine, catching up on emails and suddenly thought, "I know what to do with that!".


In the box contained a wooden anchor monogrammed with our initial. I had ordered it last spring or summer. I knew where I wanted to hang it, but always thought it needed a little something more in the space so I tabled the project. Until wine-aspiration hit.

I knew we had some left over pallets from a Christmas present. We kept meaning to put them in the trash collection or give them to someone who could use them, but never did. I thought if we could use the pallet wood to make a backing for the anchor sign it might look good.

I called over Mr. Cute and made him one of my infamous design drawings. He took two seconds to look at it and said it would be super easy for him to knock out.


Saturday rolled around and after our soccer parent duties were done for the day, he broke out his tools and got to work. Within an hour we had our sign ready to hang!


I took a few pictures through the process in case anyone wants instructions on how to make their own.


HOW TO MAKE A DIY ANCHOR PALLET WOOD SIGN

WHAT YOU'LL NEED
  • A wooden anchor or design in your choice (obviously these instructions could work with anything. You would just have to adjust your dimensions). I ordered my monogrammed anchor from here
  • Pallet wood - This project used approximately two pallets of wood. 
  • Trim nails (We used a nail gun to mail this process a little quicker.)
  • A compound miter saw (Not sure if this is necessary, but it made the project go much faster. You could probably saw and sand, it would just be a longer process.)
  • Chalk paint

INSTRUCTIONS
  • Pull all usable boards from your pallets. We made our sign 19" across, so Mr. Cute made sure to pull good boards with enough length for him to trim down. 
  • Measure, mark and cut down the boards to your desired size. Again, we knew we wanted a sign around 19" wide so Mr. Cute cut down around 8 boards at that length with his compound miter saw. 

  • Arrange the boards in the order you want before adhering them together. Because of the varying colors of wood we made sure to arrange the boards in a pattern we thought would look best. 


  • Once you've chosen your desired layout you can begin nailing the boards together. Mr. Cute cut  two boards the length of the sign for the back (our was approximately 26" in length). He placed the boards in the pattern we chose on top and then nailed each board into them with trim nails. 


Note: Originally we were going to frame in the sign too, but we didn't have enough usable wood left over from the pallets. 

  • Now that the pallet backing is done, lay flat and place the monogram on top to make sure everything looks the way you want it and measures correctly. 

  • Time to paint! 


Originally I had plans to paint the pallet wood white and the monogram navy, but once I saw it all together I thought it actually looked good natural. Mr. Cute suggested maybe just painting the monogram so I went with a white chalk paint and loved how it turned out. 


  • Let the chalk paint dry and then paint over it once with a clear coat

  • After everything is dry, remeasure and place your anchor on the pallet wood for final attachment. 

  • Attach the sign with two small trim nails at the top and the bottom. Fill in any holes with a quick touch up of your paint color. 

  • Time to hang! Now your DIY anchor pallet wood sign shoulda be ready for display! 


We have a little rolling bar cart/cooler someone gave Mr. Cute a few years ago on one of our patios and I placed the sign over it. The minute we hung the sign I knew it was the perfect use for the monogrammed anchor.  We hung the sign a little higher than normal because I didn't want anyone to knock into it when they were opening the top of the cooler when getting a drink. It is super heavy and falling on someone would most definitely hurt. 


I have plans to add a little something to each side of the sign. Maybe glassware holders or two smaller signs? I'm tossing a few ideas around in my head. A little more wine-spiration and I'm sure I will come up with something good. ;)


But for now, I love that it was a quick and easy project and it looks great in the space! And I never thought I would be a pallet wood kind of girl, but after seeing it all together I am already thinking of other projects I can make with it.

Do you have a pallet wood project you have done? Share with us! I can't wait to see what all the possibilities are! 


Come spend the day with us on:
Instagram | Pinterest | Facebook | Twitter |

Tuesday, February 6, 2018

Easy DIY Valentine's Day Pillows

There's nothing we love more than a holiday that celebrates love. We know for some people this is a completely cheezy unnecessary holiday. We are not those people. 

We go way over the top and celebrate February with everything we've got. We promote love. We promote kindness. We wear it loud and proud, and we showcase it from our front porches to our back porches, and every space in between. 

We love love. 

Plus it's like ten degrees out, football season is officially over, and that darn groundhog predicted we have six more months of Winter. What else do we have to live for? 


When we pulled out our Valentine's Day decor this year we noticed we were a little lacking in the throw pillow department. Now I'm not one to shy away from a good trip to Home Goods, or (my personal favorite) Pottery Barn to stock up on some adorable themed throw pillows, but this year I decided to see if I could do a little something different. Make my own! 


I ordered some plain white pillow covers (I found some cheaper ones after the fact, but these worked great), and let my creativity flow. 

Well, really I raided my kids craft closet and went with the easiest thing I could think of. My goal was to create a quick and easy DIY pillow without breaking the bank in case my pillow creation skills turned out to be severely lacking and I should have just headed to Pottery Barn in the first place. 


After I was finished I was pleasantly surprised. The Valentine's Day pillows were way easier than I thought they would be! With in only a few minutes they were completely put together and ready to place on my porch! 


After thinking about it, you can totally recreate these pillows for less that $5 and the options on what you can do are endless. To learn more details and see the quick and easy instructions on how I made these DIY Valentine's Day pillows pop over to our post on Savvy Sassy Moms

Quick and easy DIY Valentine's Day pillows. Less than $5 to make. Less than 5 minutes to create!


Now share with us what design you would make on your own pillow! 
(I have plenty of extra covers and a lot more throw pillow love to share!)


Follow us on Pinterest HERE.
Follow us on Instagram HERE.
Follow us on Facebook HERE.
Follow us on Twitter HERE.

Related Posts

Related Posts Plugin for WordPress, Blogger...