Showing posts with label DIY. Show all posts

Wednesday, February 8, 2023

DIY Valentine's Day Pillows

We are self-proclaimed throw pillow addicts. We have them for every season, every holiday, and a multitude of colors. Our view is life is short, and you can never have too many throw pillows. February presents itself on the calendar, and we have so many throw pillow possibilities – the biggest being Valentine’s Day. Now this little addiction of ours can get expensive, but we’ve found the trick to keeping our habits satisfied without breaking the bank on all that fluffy cuteness. We created these adorable Valentine’s Day pillows for less than $5! That’s right – all your throw pillow dreams just came true.


This inexpensive DIY is super easy, and (bonus!) easy to store when done! What’s not to L-O-V-E?


Needed supplies:
– 2 Pillow covers (Or however many you like! For the love of throw pillows – get a little crazy!)
– 4-5 packs of red poms
– Hot glue 
– pencil


Instructions:
1: Before you begin your project, iron your pillow covers. It’s easier to do this before you start the project than after you’ve adhered your design.
2: Plug in your hot glue gun and set aside approximately 3-4 extra glue sticks for use throughout the project.
3: While your glue is warming up use this time to trace the designs you desire on your pillows with a pencil. For this project we cut out a heart we printed online and free handed the word “love”. The possibilities are endless though!


4: Begin tracing along the lines of your designs with the hot glue. Go slowly and place down the red poms as you go. Repeat until complete.


5: Once cooled remove any extra glue.
6: Insert pillow into pillow cover. (With that little throw pillow addiction we know you have plenty of extra in storage. Just pop one in and no one will ever know last season’s Christmas pillow is this season’s Valentine’s Day pillow.)


7: Display and enjoy!

The best part about this little decor project, aside from it taking only about five minutes to complete, is that once the holiday has passed we can simply unzip the Valentine’s Day pillow cover and easily store it for next year!


Come spend the day with us on:


Monday, March 21, 2022

Antique Desk Makeover

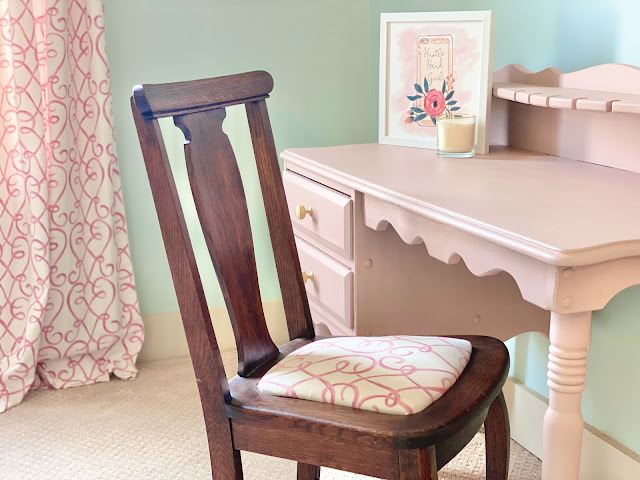
A few months ago my mom asked if I wanted to have an antique desk that belonged to my Great Aunt for my daughter's room and I jumped at the chance! 

My mom had it for a long time, but wasn't going to have a space for it anymore.  I loved the shape and detail of it, but knew I wanted to paint it to match my daughter's room.  

I used Dixie Belle Paint in Tea Rose and feel like it was the perfect shade of pale pink to coordinate with her room.  I've used Dixie Belle paint before and love the ease of it! No need to sand or prime the furniture. You literally just wipe it down to make sure it is free of dust and dirt and then paint on a few coats.  The coverage is really great and they have so many great colors.  I topped it off with the Dixie Belle clear coat and then added these new brushed brass knobs. 


I also got this antique chair and recovered the seat of it in the same fabric as her curtain panels. 


I'm so pleased with how it turned out and just love how it looks in her room!  This post is totally not sponsored, but if you are looking to paint any furniture I would definitely check out the Dixie Belle line!  

Follow us on Pinterest HERE.
Follow us on Instagram HERE.
Follow us on Facebook HERE.
Follow us on Twitter HERE. 

Wednesday, September 8, 2021

5 Minute DIY: Varsity Patch Fashion


It's been a hot minute since we did a craft or DIY. Especially when it comes to fashion. But the minute we spotted the varsity letter trend going around, we were in love. We ordered a few items from one of our favorite retailers, and they are SUPER CUTE. 

The problem: It took almost two months for one of our orders to arrive. 

As quickly as trends come and go, we can't have that. So, as we were doing our nightly texting/wine drinking we came up with a brilliant idea (as one does when they are texting and drinking with their best friends) - "We can totally make these!"

So we did. 


And it was suuuuuuper easy. Like the longest part of the process is picking out your items you want to bedazzle with sparkly letter patches. 


 Here is all the info and instructions on how you can make your own Varsity Patch Fashion items. But if DIY isn't your thing, scroll down for some super adorable already made options we found. 


DIY: VARSTIY PATCH FASHION


Total Project Time: 5 Minutes
Total Cost: Under $20 

(Note: depending on what items you decide to patch or how many patches you apply. For us this project stayed under $20 for each item.)


ITEMS NEEDED

- Iron-on Varsity Letter Patches (We purchased ours from here and here. Shipping was super quick!)
- Hat, shirt, sweatshirt, etc. (We purchased this white sweatshirt, this aqua sweatshirt, this leopard tunic sweatshirt, and this white hat. All come in multiple color and pattern options.)
- Iron
- Ironing board or flat heat resistant surface
- Sharp scissors 


INSTRUCTIONS

1: If you desire to have your hat or sweatshirt have that distressed look, do that first. Use the scissors to cut little notches, create pulls or rough up the edges. 


2: Warm iron up on high/cotton setting. Set aside on heat resistant surface. (Note: Do not set to steam.)

3: Place article flat on ironing surface.  

4: Pre-heat area where the varsity patch will be applied. Heat for about 30 seconds. 

5: Place patch on heated area, and then place iron over patch. Do not move iron around. Apply pressure for approximately 30-45 seconds. 

6: Check that item is secure, and set aside to let cool. 

7: Wear and enjoy! 


SHOPPABLE OPTIONS

We know DIY isn't everyone's forte. Even at only 5 minutes. If you like the trend, but don't want to mess with DIY, here are some shoppable already made options. Click an item and it will show you the details!


Come spend the day with us on:

Friday, July 2, 2021

5-Step DIY Wall Shelf


Slowly, but surely, we are making our house feel like a home. Funnily, the spaces I've been concentrating on the most are the ones we aren't frequenting often, or aren't seen by many people. 

Why?? 

The only thing I can think of is that these rooms are blank/clean spaces. No clutter. No kid toys. No random piles from my husband. Just blank rooms I can be creative in. 

The guest bedroom has been one of my favorite to work on. Coastal style is my jam and this room is chock full of it. I'll share a full tour soon, but first I wanted to share an easy project that I did to help complete the room. 

The walls of the guest room were looking pretty plain. Especially over the bed. We've done all these fun features, but the rooms still looked kind of "blah". I knew I wanted to include some coastal themed artwork and water color prints that we've collected on our travels, but nothing would be large enough for the space.

It's also a guest bedroom/pool changing area, and I didn't want to spend a ton of money on anything. After looking at all my available artwork, I decided to hang a shelf and do a framed display of some of the pieces. 

I had a chippy/coastal/antique style shelf in mind and couldn't quite find what I was looking for in a brick and mortar. Then online I was shocked at some of the prices. 

After perusing the every popular Home Depot for ideas, I realized I could make my shelf pretty easily. 


I purchased the few materials I needed, decided what paint color to use, and with in one afternoon and just a few steps, I had a wall shelf! 


I loved how it turned out. I especially loved how it was much cheaper than what I was looking at online. I really really loved that it only took about an hour or so of work to make. 


What do you think??


INSTRUCTIONS TO MAKE YOUR OWN 5-STEP DIY SHELF

(Note: We've made a similar shelf in my son's room multiple times. So the idea was born from those instructions.)


Materials Used:


Instructions: 
  1. Cut your board to size. (We had a board on hand that I used. It is approximate 4 feet in length.) 
  2. Paint all sides of the board, and the corbels.


  3. Once the paint is dry, use the sandpaper to smooth all edges and corners. (To get that distressed look you sand down edges to the raw wood.)


  4. Hang and secure the corbels to desired location in the wall with drill and dry wall screws.


  5. Center shelf board over corbels and attach with screws


    And that's it. Just a few steps and the shelf is DONE!


Additional Notes: 
- If you don't have a saw to cut your board, Lowe's and Home Depot will both cut the board to size for you on site. 
- I hung my corbels in three inches in from the edge of where I wanted to the edge of the shelf to be. You can put them at the ends or bring them in. Either way it looks great! 
- You can touch up shelf board with wood putty and a dab of paint if desired to hide the screws. I skipped this step since my shelf is high enough up they wouldn't be noticeable. 


Come spend the day with us on:

Friday, March 12, 2021

How to Create Farmhouse Style Soap Dispensers


Now that we've lived in our new house for a little over eight months, I think we have finally moved on from the renovation part of our move. Now I can concentrate on the fun part of our move - the decorating! And trust me when I say I've created a loooooong list of small projects that we need to knock out. 

Some of the projects are a little larger and require some assistance from my favorite handy man. (Sorry, not sorry, Mr. Magnolia - get your tool belt ready!) However, most are quick and easy finishing touches I can do. 

One of the smaller projects on my list was putting the finishing details on our guest bathrooms. For the most part everything is finished with both of these spaces. But, I just wanted to add a little more of a custom touch or two to each space. With the approaching Summer months, I know our basement bathrooms will be getting a lot of use once we re-open the pool. I'll share a full tour soon, but for this post you are going to get a super easy project I was able to knock out that returned a major impact. 


Before, I had just placed a simple store bought soap dispenser in each bathroom. Scrolling through Pinterest one day looking for bathroom decor ideas, I spotted a fun soap dispenser set. That got me thinking that could be something I easily exchange out to add a little something "extra" to the bathrooms. 

Let me just tell you - I almost can't claim this as a "project" because it literally took two less than five minutes to complete. But look how adorable! 


HOW TO CREATE FARMHOUSE STYLE SOAP DISPENSERS


WHAT YOU'LL NEED

- Blank & smooth surface soap dispensers (I ordered a few sets, but used this soap dispenser set for this project, which come in a few finish options.)
- Custom labels (You can design your own with the help of Photoshop, Canva, etc. I purchased this label set and this label set from Etsy.)


- Waterproof Vinyl Sticker Paper 
- Scissors
- Desired dispenser fillers: soap, lotion, hand sanitizer, mouth washer, etc. 


INSTRUCTIONS

- Wipe off the surface of your soap dispensers. Make sure they are free of dust, crumbs, etc. 
- Print and cut out your labels.


- Carefully place label on the surface of your soap dispenser. Start at one corner and slowly smooth down the label as your go so that any bubbles can be avoided. 


- Done! Just add soap, lotion etc. 


See...SO EASY! 


I had my favorite soap and lotion on hand to complete this project. In another bathroom I used the "hand soap" and "sanitzer" labels. I love the look of them so much I've already ordered a few more dispenser sets for the remainder of my bathrooms. Even one for my kitchen sink! #cantstopwontstop


Come spend the day with us on:


Related Posts

Related Posts Plugin for WordPress, Blogger...