Showing posts with label teen hangout space. Show all posts

Tuesday, March 30, 2021

Teen Hangout Room {Part 2 - It's DONE!!!}

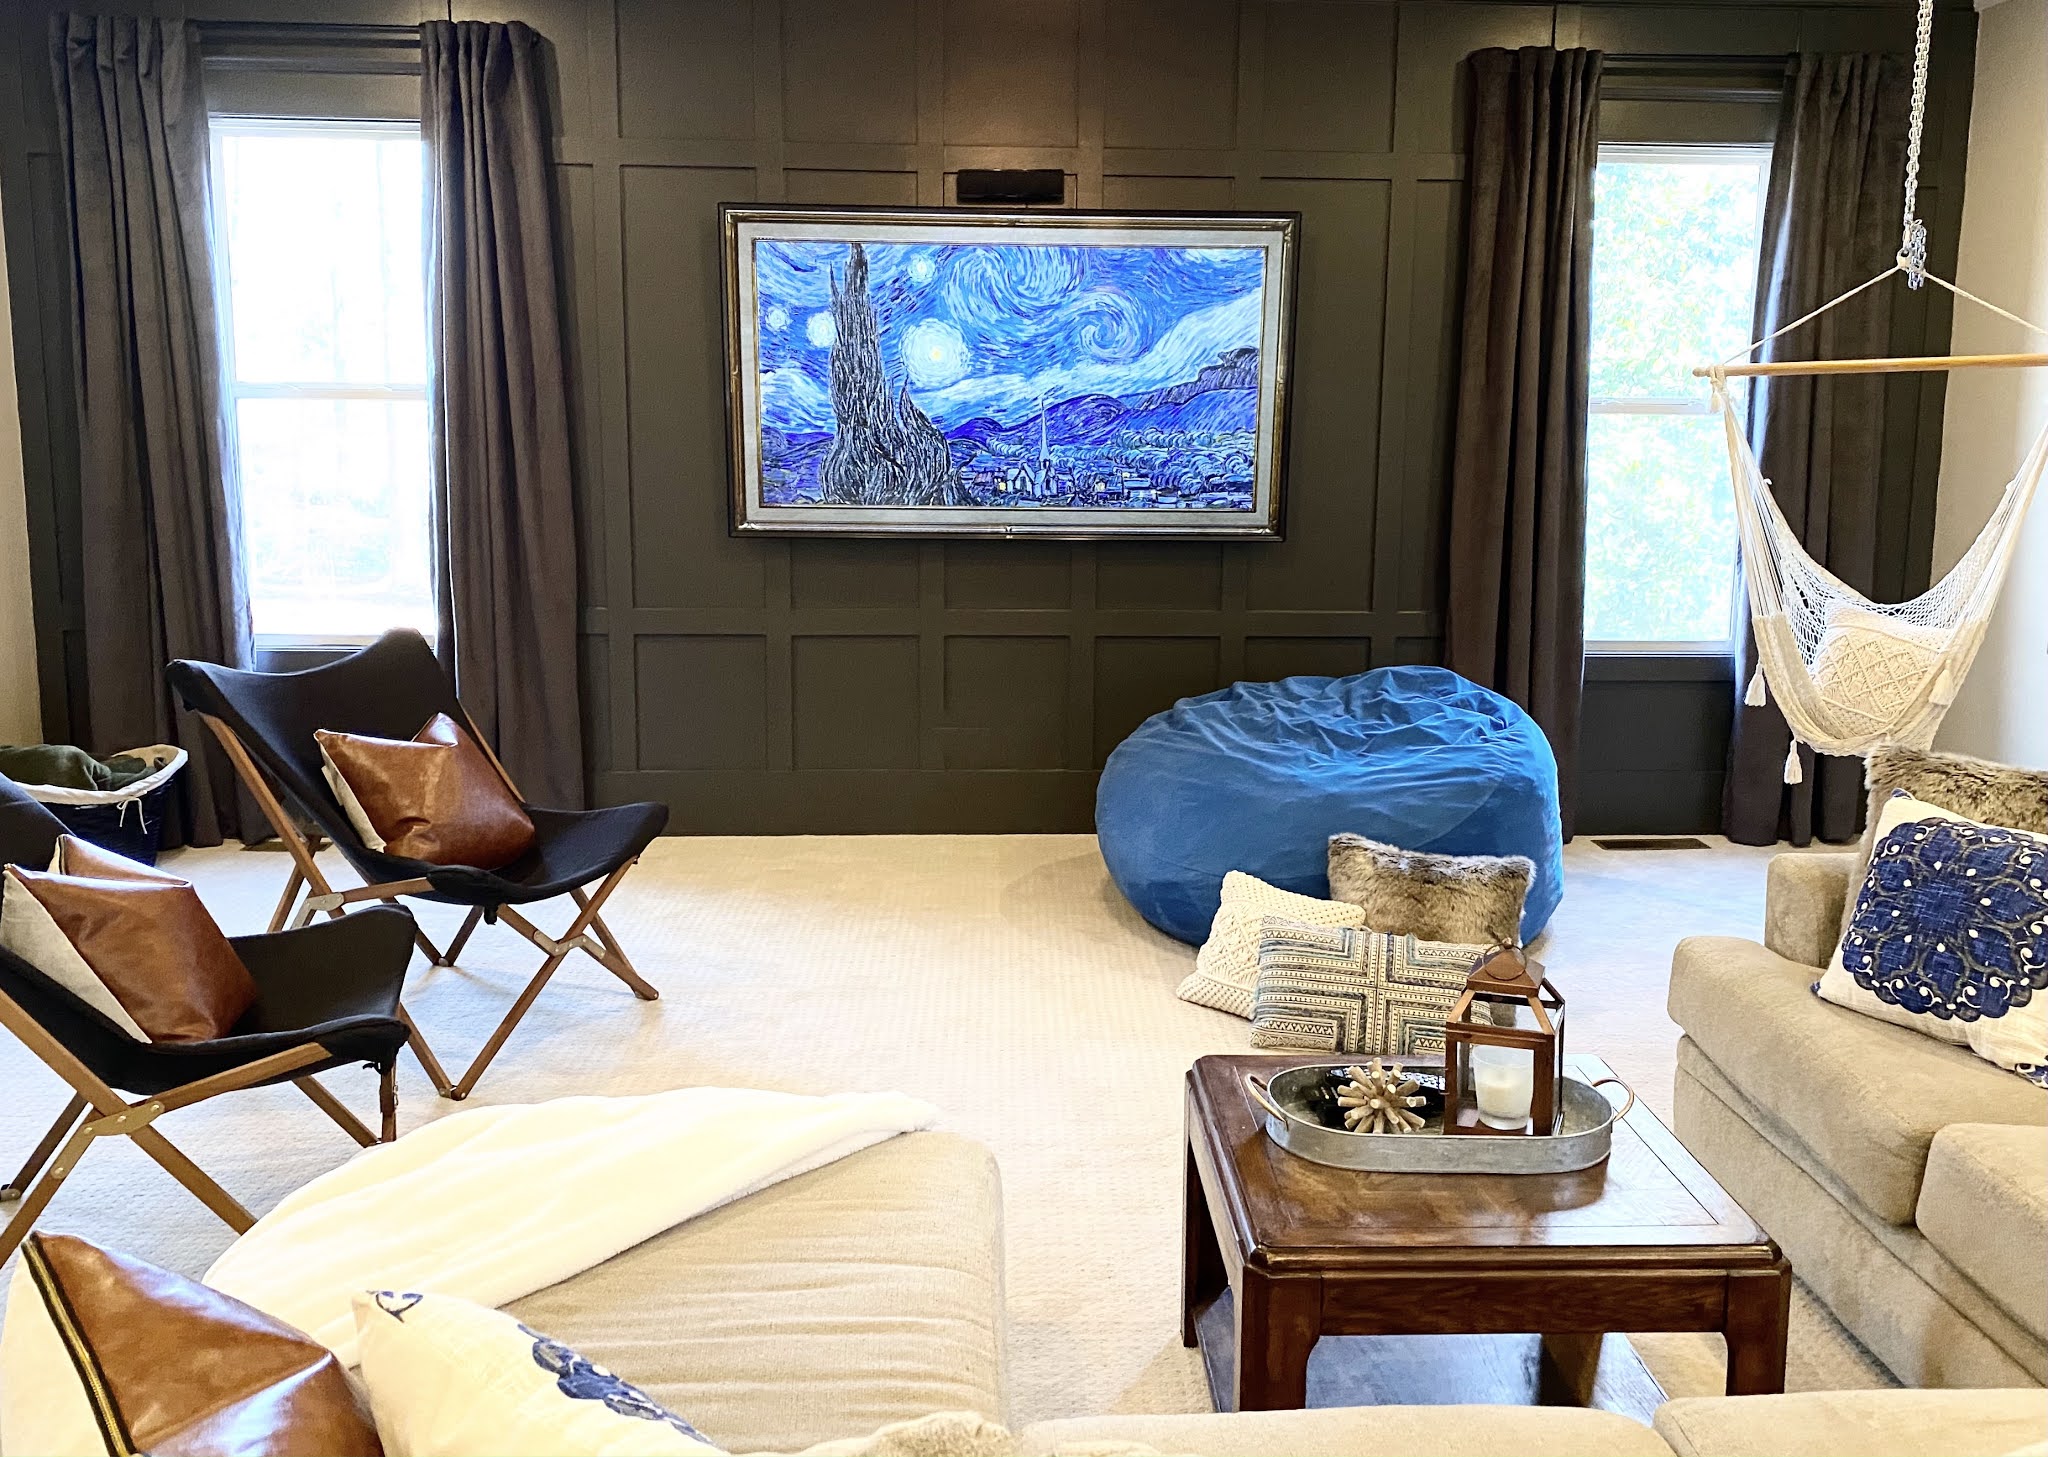
I'm so excited to finally share the completed Teen Hangout Room/Media Room!  It's actually been done for a while, but I finally got a chance to take pictures when my kids weren't in there.  :-) This room used to be our play room and I shared the first part of the transformation HERE.  


My goal was to make this a spot where the kids would want to hang with lots of comfortable seating options.  I love how everything came together using mostly items we already owned.

We added the accent wall and painted that dark (SW Urbane Bronze), which I don't regret one bit. We got new carpet, and then moved the sectional from our living room into this space.  It's big and super comfortable so it is perfect for this room.  All of the other furniture is stuff we already had in other parts of the house.  

The giant blue bean bag chair is something my son bought on his own and I knew it would be great in here, but just wasn't sure how to tie it into my boho vision. When I found a few pillows with the same color in them at Tuesday Morning I just knew they would be perfect.  


The other pillows are either from Amazon or Wal-Mart. Their Better Homes and Garden line has the BEST stuff at very affordable prices.  


We moved the air hockey table from our basement into this room and the kids have played it more than I think they ever have...especially if they have friends over so that's been fun for them. 


After all my sewing for the new living room curtains I knew I just wanted to buy something for in here. These velvet curtains aren't 100% blackout, but they do a pretty good job and certainly make the room super dark during the day if they kids want to watch movies in here.  


I'm so happy with the way the room turned out!  Not only do the kids love it, but the Mr. loves hanging out in there too because it's so cozy and the giant TV on the wall is pretty enticing. It accomplished exactly what I wanted to to and we still have the closet to store the toys that will occasionally get used. 

Follow us on Pinterest HERE.
Follow us on Instagram HERE.
Follow us on Facebook HERE.
Follow us on Twitter HERE. 


Thursday, January 14, 2021

Teen Media & Game Room {Part 1}

If you read the blog yesterday, you learned that my 2021 goal is house projects and our first one is already underway! A little back story first.  When we were renovating/building our house I knew I wanted a big playroom on the main floor because at the time my kids were young.  It was the perfect spot to house all of the big toys like the train table, play kitchen, dress-up clothes, art station and more!


When the kids got a little older and weren't playing with those types of toys anymore we transition it more to a homework/hangout space which they liked, but rarely used. 


My son will play in there if he has a friend over and still likes some toys, but for the most part they are sort of past that phase which brings a tear to my eye. If given the chance to time travel, I would turn back the clock to the day my oldest was born in a heartbeat.  But, since that isn't going to happen, I'm embracing the stage we are at and making this room functional for our family.  We've been debating what to do for some time now and finally decided to transform it into a Teen Media & Game Room.  

I did what I always do when I'm looking for ideas for my house and logged into Pinterest to start searching!  I found so many great ideas and got some really good inspiration.  


After all of my pinning and "research" I knew that I wanted to do some sort of dark accent wall, have comfortable seating for the kids, and that the Mr. wanted a big TV in there.  I'm super pumped about the cool accent wall and all the kids care about is when we're getting the new TV. 

Because the room is really big and the lounging/TV section is only going to take up part of the room, we've also decided to move the air hokey and foosball table from the basement up here, too.  I honestly think they will get used more being right off our main living space.  We'll still have some toys in the closet in there (because I'm just too sentimental and for the VERY occasional time they get used) and I've got to come up with something to do with all of the the giant Nerf guns we own.  Besides that, the playroom part of the room is going to be gone. I had a really hard time taking down the children's artwork gallery wall. 


Once we decided what we wanted for the wall I was in camp hire "let's someone to do the work" and the Mr. was in camp "I can do that." I let him have at it and last weekend he worked nonstop! 


He moved electrical outlets, tore off baseboards, patched drywall, and did all of the trim work himself.  I was just the assistant holding things in place when asked, so this was really all him.  


I helped paint on Saturday night (this is 40), and was really happy with the color I'd picked. We went with Sherwin Williams Urban Bronze which I have now learned is the 2021 color of the year. How fitting. 


I love this wall.  It makes such a statement when you walk in the room and all of the other walls are now freshly painted and free of random crayon marks. 


All of the trim work and drywall patching done, the painting completed, and the room is mostly cleared out except for some random furniture we are going to donate. Next up is new carpet and then the fun stuff like curtains, moving furniture in and yes, the big TV! 

Follow us on Pinterest HERE.
Follow us on Instagram HERE.
Follow us on Facebook HERE.
Follow us on Twitter HERE. 

Friday, September 7, 2018

DIY Chalkboard Wall {Tutorial}

Yesterday I shared our updated playroom. Not quite sure what the name for this room should be. Tween Room, Hangout Room, Bonus Room?  Anyway, I knew that I wanted to do a chalkboard wall for the kids to be able to draw on and convinced the Mr. to help me with the project.  Thought I would share our step-by-step directions for anyone else who might be thinking about a similar project!


Step 1: 
With a lot of patients and the help of a level we taped off the size we wanted the chalkboard to be. Ours is about 65x45.


Step 2: 
I read a lot about different types of chalkboard paints and decided that pretty much any of them would work just fine for what I was doing.  I ended up going with the Rustoleum brand because I've used a lot of their products in the past, but I think they all work about the same. 


As I started painting it looked more navy blue than black, but once it dried it was black. I did about 3 coats just to make sure it was good and covered! 


Step 3: 
Let it dry! It says to wait at least 3 days for the chalkboard finish to be done. That wasn't a problem for us. We got busy and had to wait about 2 weeks!


Step 4: 
I knew I wanted the chalkboard to be framed so that it looked like it was hanging on the wall and the Mr. helped with this step. He got 1x3 trim boards and cut them to fit around the chalkboard.  We painted them first using the same color as our interior doors (Backdrop by Sherwin Williams) and then hung them up.  


Step 5: 
Before using the chalkboard it had to be conditioned.  Following the directions on the paint can we coated the entire surface with chalk. Basically hold a piece of chalk lengthwise and rub it all over the chalkboard paint.  I have no idea what difference it makes if you do this step or not, but it said to do it so that is what we did.  I got the girls to help me! 


Step 6: 
After coating the entire thing with chalk, you erase it all entirely and then your surface is ready to draw on.  As I was erasing they were both like, "that is so satisfying" which just cracked me up.  Not sure if your kids use that word or not, but it's the new lingo amongst the youngins these days and I don't know why but it cracks me up. 


Step 7: 
Draw, color and have fun!  They are loving the chalkboard and it makes me so glad that I decided to do this project in the room.  Directions on the paint say it can be wiped clean with a wet cloth, but then it should be conditioned and erased (steps 5 and 6) before using it again. 


We hope everyone has an amazing weekend!!!

Follow us on Pinterest HERE.
Follow us on Instagram HERE.
Follow us on Facebook HERE.
Follow us on Twitter HERE.


Thursday, September 6, 2018

Tween Hangout Room {Playroom Makeover}

A few months ago I started our playroom makeover. It had been a long time coming.  My kids had outgrown the toy phase and rarely used the playroom anymore. So, I set out to transform it into a room that they would use.  I shared the Homework Station space a while back and today I'm sharing the full room details.  


The homework station has not been used nearly as much as I would like because the kids are in such a habit of spreading out on my kitchen island, but when one of them wants to get away from the noise and have their own place to work they will go in there. 


I can also see that as they have friends over to work on projects or just hang out they will use that space more and more. 


So one part of the room is the homework station and lots of open space in which my Boo-Boo likes to create ninja courses...


And the other part of the room is more of the hang-out space where the kids can watch movies or TV, chat with their friends, or just relax...


We had the couch in there already, but I wanted to find some other fun seating so purchased two of these butterfly chairs and the kids love them. 


They are actually really comfortable and so affordable!  I also got four of these poofs (this color is sold out, but lots of other options HERE). 

The black and white rugs were on clearance at the end of the summer and they are actually outdoor rugs, so I'm hoping they will be able to stay clean and withstand any messes that might occur. 

These fun pillows kind of tie everything together. The black and white square ones are also outdoor pillows so they clean up very easily and I loved the Adventure one!  Seemed fitting for the age group I was thinking about when doing this room. 


We used to have one of these hanging in the playroom, but it had seen better days after lots of use over the years so we switched it out for one of these hammock chairs. The kids LOVE sitting in this. 


Also in the background there you can see the giant chalkboard that we added. I'm going to post all the directions and my tips for that project tomorrow! 

If found this wooden bead and pom pom garland and thought it was so much fun!  It also comes in pink, but the black and white was perfect for this space! I hung one stand on the hammock chair and also above the table in the room. 


I left up the artwork gallery wall because I love looking at it and thought it would keep some fun color in an otherwise neutral room. 


Honestly, the biggest part of this project was cleaning out and getting rid of all the toys. I sold a bunch, donated a bunch, threw out a bunch, and gave a bunch away to friends with younger kids. My kids, mostly my little guy, went through and picked out some things he still wanted (mostly Nerf guns, a few cars/trucks and all the balls). Most of those things are either in the closet in that room or in some baskets and other storage we kept. 


Also, Blondie still loves playing school so we kept her "teacher stuff" and white board easel in one are of the room.  


Overall, I'm so happy with the way it turned out and the kids seem to be enjoying it. They are definitely using this room more since the transformation and that was my goal!  I'm sure we'll change it again at some point, but for now it works during this stage of life! 


Follow us on Pinterest HERE.
Follow us on Instagram HERE.
Follow us on Facebook HERE.
Follow us on Twitter HERE.

Related Posts

Related Posts Plugin for WordPress, Blogger...