Showing posts with label style blogger. Show all posts

Tuesday, May 22, 2018

Frozen Peach Raspberry Sweet Tea Recipe

The official start to Summer is just days away, and we could not be more excited! We are so ready for eight weeks packed full of lounging at the pool, frolicking on the beach, sleeping in late, playing in the yard until it's dark (or way past dark), skiing behind the boat, and grilling out with friends. Occasionally we might have to throw some work in here or there, a sibling battle will probably occur, and we will hear "I'm bored!" approximately 5,498 times, but the sweet summertime memories we will make will far outweigh those few moments.

Summer is by far my favorite time of year to entertain. There's just something about this time of year that makes entertaining so much fun. In the south summer wouldn't be complete without at least a dozen cookouts thrown in. From impromptu steak on the grill nights with neighbors to over the top backyard soirees with friends and family to celebrate a holiday - I love it all! I sit back in my favorite adirondack chair with my favorite Milo's Sweet Tea to cool me off, and smile knowing these are the best days.


Because I love hosting people in my home this time of year I make sure to have a few staples always on hand, and have a few quick go-to recipes in my back pocket that I can whip up with in minutes. I love hosting. I do not love spending my entire time in my kitchen cooking the perfect meal. I love being able to wow people with my mad kitchen skills, and making it all look effortless because, well, I've made it effortless.


Southern host tip #1: Always always have sweet tea on hand. Always. As any good southern host knows, no event is worth mentioning unless sweet tea is involved - especially in the summer!  And it better be made to perfection or people will be speaking about it for decades.


I always make sure I have a large stash of Milo's Tea on hand. Milo's Tea is the absolute best tasting and remember my whole commitment to effortless entertaining? They are the experts in tea making and who am I to come in and try replicate perfection?

Milo'sTea comes in a variety of different flavors (all natural sweetened with pure cane sugar, no calorie, and unsweet) - so there is a little something for everyone! My personal favorite to drink and use in recipes is Milo's All Natural because it is sweetened with pure cane sugar.


I'm not the only huge fan of Milo's Tea. It's award winning taste has been savored for generations.  Milo’s Tea was created in the famous Milo's restaurant founded in 1946 by Milo and Bea Carlton after Milo returned from serving his country in World War II.  The teas are all naturally brewed with no colors, acids, additives or preservatives to keep in line with Milo and Bea's vision for using high quality ingredients to never sacrifice on taste. Today, Milo's Tea is still a family owned company located in Bessemer, Alabama. So quite literally every sip provides a little south in your mouth. 

I found Milo’s at my local Target in the refrigerated juice section but they are available in lots of retailers. Find a store near you by using the store locator.

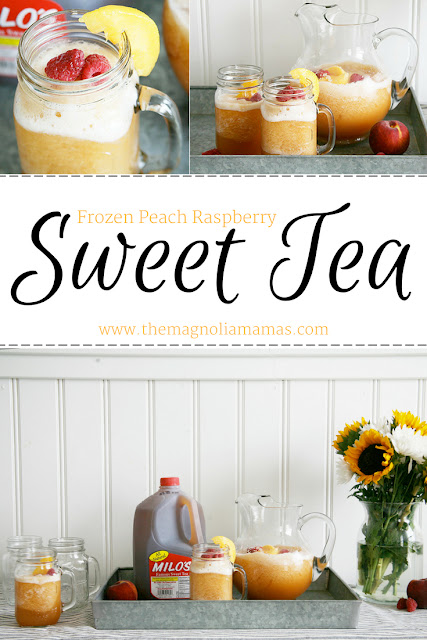
Now, while I know better than to mess with making own sweet tea, I have become an expert on utilizing that delicious tea in a variety of ways. Because it's a staple in our house, I love using sweet tea as a base to make other drinks. This Frozen Peach Raspberry Sweet Tea is my favorite! Georgia is the peach state after all and what kind of hometown girl would we be if we didn't marry the peach and delicious sweet tea an occasion or two? The Frozen Peach Raspberry Sweet Tea is one of my biggest crowd pleasers and it literally takes five minutes to make. 


With a few shortcut tricks I've learned along the way, I've narrowed down the Frozen Peach Raspberry Sweet Tea recipe to just a few quick steps so that it making it doesn't take time away from your guests. Because trust me, you will be requested to refill that pitcher several times once everyone's had a sip or thirty. 


HOW TO MAKE FROZEN PEACH RASPBERRY TEA

Serves: 6-8
Prep Time: 5 mins


Ingredients
- 4 cups of Milo's All Natural Sweet Tea or Milo's No Calorie Tea (both result in the same delicious taste!)
- 1 cups of raspberry juice
- 1 cup of peaches, sliced
- 1 cup of ice cubes
- 1/3 cup of raspberries


Note: I like to use frozen peaches because the recipe will end up with a frozen texture anyway, and it saves a lot of time and effort. Less time slicing is more time sipping!


Directions
1: Place peaches and ice cubes and blend until diced.
2: Add sweet tea, raspberry juice, and raspberries. Blend until smooth.
3: Pour into pitcher.
4: Garnish with fresh peach slices and raspberries.
5: Serve and enjoy immediately.


Do you have a drink you make with tea? What is your favorite? Share with us! We are always looking to try a new one out with our guests. 


Come spend the day with us on:
Instagram | Pinterest | Facebook | Twitter |

This post is part of a social shopper marketing insight campaign with Pollinate Media Group® and Milo's Tea Company, but all my opinions are my own. #pmedia #MakeItWithMilos  http://my-disclosur.es/OBsstV

Frozen Peach Raspberry Sweet Tea Recipe. The yummiest sweet tea drink for the summer made with Milo's Tea! #MakeitwithMilos #Pmedia #ad


Thursday, August 21, 2014

Birth Of A Backpack Wall

With back to school in full force, I snapped into super organization clean out mode. Some people get this urge in the Spring, but I get this way at least once a month. Being just a tad bit Type A (well, maybe more than a tad bit) clutter makes me anxious. Living with a busy three and a half year old who's daily mission is to seek and destroy, a busy nine month old who thinks the kitchen cabinets are her playground, and a husband who has slight hoarding tendencies, let's just say that the house makes me anxious a lot. 

One of my huge issues became how our island and our doorknobs were starting to become catchalls for all of our bags. School bag, cooler, lunch box, purse, laptop bag, diaper bags...it was getting out of control! So I decided we needed to remedy that ASAP.

I began to scour the internet for ideas. 

My husband got the nervous twitch he gets when I start to scour the internet for ideas.

After much debate, I finally landed on something that I liked on Pinterest. I showed the hubs my plan and after much persuasion that this project was life changing and will look fabulous when I was done, he begrudgingly happily headed off to Home Depot to get me supplies. 

Here's the space I chose for our project. This is the hall that enters from our garage and contains our pantry, coat closet, and laundry room entries. It's a fairly long sized plain wall, and it was hidden from the main area of our house. I thought it would be perfect. As you can see, even in my before shot we have few bags hanging on doorknobs. Boo!


After measuring and drawing up a plan, we tore off our baseboard and began framing out our wall. The original plans we had to tweak a bit as we decided to not move our light switch. The whole height of the framing is about five and a half feet. (I was nervous this would be a little high, but with ten foot ceilings and testing out that my son would still be able to reach the height of the hook, it worked out fine). 


Next up, chalkboard inserts. We bought a sheet of chalkboard, cut it to size with our Dremel, secured each one in place, and surrounded the edges with black caulk. Some people like to use chalkboard paint here, but this seemed a little easier to me and one less thing to paint. 


Next step was the caulking and sanding portion of the project.

Once we knew everything was nice and smooth, I strolled over to our local Sherwin Williams to pick up some paint to match our existing trim. Our project ran into a little snag when the associate told me that they no longer make the paint our trim is done in. I let that sink in for a few moments (we have A LOT of trim work in our house), then decided to just come to terms with the fact that I would have to paint all the trim in that area to match and had the nice associate whip up something he assured me would be similar to the rest of our house.

While he frolicked away to mix up my order, I had a moment of inspiration and decided if I was going to have to be painting more than I thought I would I might as well go all in. I checked out a few chips off of the color wheel I had with me, chose a neutral beige for the remaining wall space left to paint, and hoped it coordinated with everything else.

Next, I headed home with my almost doubled paint order to start on my now much larger paint job. It's all good though...I was about to be in clutter-free island heaven!


The trim took about three coats of paint before it looked perfect. And you don't need to have me bore you with a million painting pictures.

Now onto the fun part...hardware! The project is almost done. I know you're just as excited as I am! 


We installed the hardware, re-hung our peg board and our gallery of wall photos, and voila! Our project was officially complete! Wahoo!!


 I loved how it turned out. I love how everyone now has their own little spot for their bags. I love how a formerly plain looking useless space in my house now looks a little more complete. And most of all I love that I can now actually use my doorknobs for their intended purpose. 


Come spend the day with us on:
Instagram | Pinterest | Facebook | Twitter |


How to build a backpack wall. Quick and easy back pack wall design.


Related Posts

Related Posts Plugin for WordPress, Blogger...