Showing posts with label DIY home decor. Show all posts

Tuesday, December 21, 2021

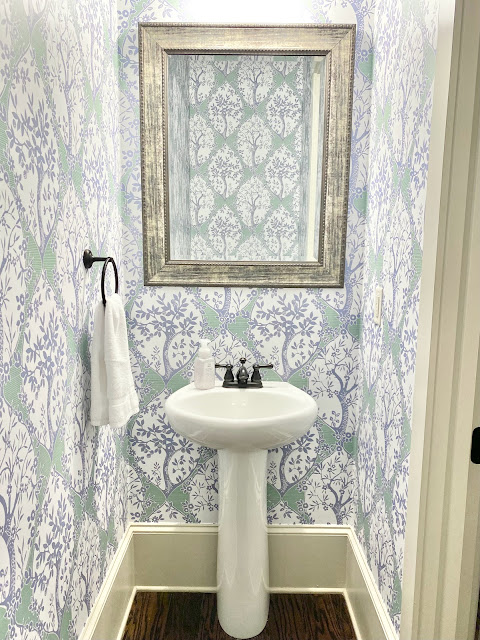
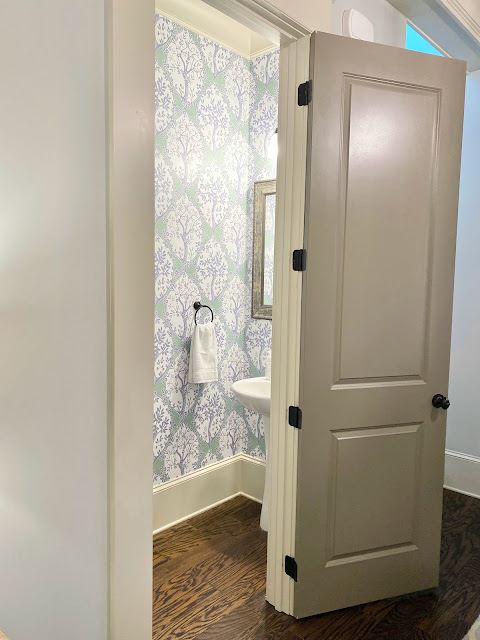
Powder Room Wallpaper Project

I have been thinking about, pinning pictures, and dreaming of wallpapering my first floor powered rooms for over a year now.  We've been focused on a pool project all year long so I felt like I couldn't spend too much or take away the focus from that, but I finally decided to ask for the wallpaper to be done as my birthday gift (which was at the beginning of November) because I just wanted to make it happen! 


I looked at samples online, read a lot of different reviews and ultimately decided to go with peel and stick wallpaper in case I didn't love it so it wouldn't damage our walls.  I knew I wanted to do a big pattern for one and something a little more toned down for the other, but we started with just one room to make sure we could actually make it look good.  

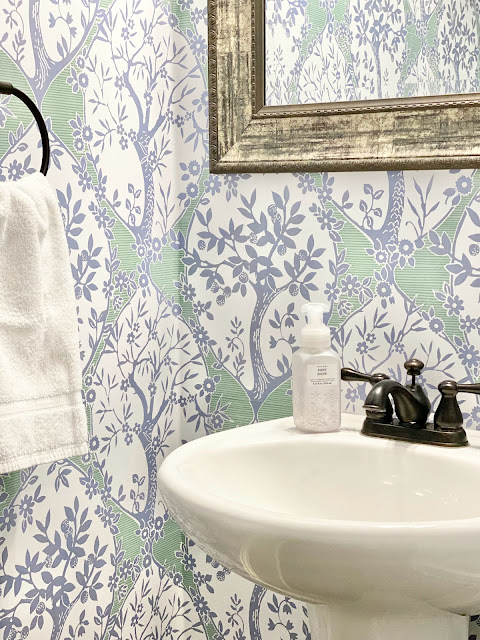
I kept going back and forth about my pattern, but my eye kept going back to THIS ONE. One thing I learned during all of my looking is that a lot of places have the same products.  All of the wallpaper specific sites have a ton of the same designs as somewhere like Wayfair and even Home Depot. I ended up ordering mine from Home Depot because I figured the returning would be easy if I decided I didn't like it for some reason and you know what, it's a good thing I did.  I totally did the math wrong and ended up ordering DOUBLE what I needed. Taking back the extra was a breeze though because I could just return it to my local store.  


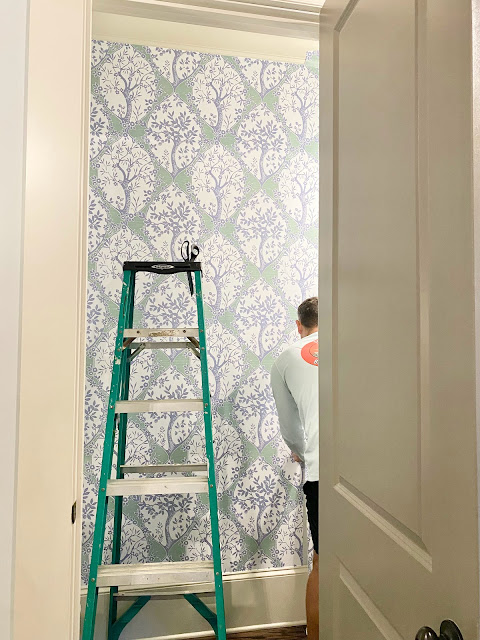
It sat in a closet for a little over a month because we never had a free day to tackle this project, but I really wanted it done before Christmas so last weekend we got started.  I watched some YouTube how-to videos and we just went with it.  


It was certainly a learning process and we got better the further along we went.  I will be honest that it wasn't easy, but totally doable depending on what level of perfectionist you are.  I think doing a regular wall in a normal room would have been a breeze, but going around our pedestal sink, light fixture, and those dang corners made for a few bad words. We probably spent about 9 hours over two days getting it done, but it was 100% worth it to me.  I use "we" very loosely.  Actually, my handy hubby did it all and I was just there for moral support and to hand over tools when needed. 


I can't stop staring at it every time I walk by and I just can't get over how it changed the look of that room.  It's not perfect, but it's pretty darn good and with such a busy pattern I think we're really the only ones who will know where the mistakes are unless you are looking for them.


Not 5 minutes after we were done I asked him if he would be up for doing the other power room. He said he needed a minute, but I'm pretty sure I can convince him to get that one done.  Maybe that will be a project for 2022! 


Follow us on Pinterest HERE.
Follow us on Instagram HERE.
Follow us on Facebook HERE.
Follow us on Twitter HERE. 

Friday, March 12, 2021

How to Create Farmhouse Style Soap Dispensers


Now that we've lived in our new house for a little over eight months, I think we have finally moved on from the renovation part of our move. Now I can concentrate on the fun part of our move - the decorating! And trust me when I say I've created a loooooong list of small projects that we need to knock out. 

Some of the projects are a little larger and require some assistance from my favorite handy man. (Sorry, not sorry, Mr. Magnolia - get your tool belt ready!) However, most are quick and easy finishing touches I can do. 

One of the smaller projects on my list was putting the finishing details on our guest bathrooms. For the most part everything is finished with both of these spaces. But, I just wanted to add a little more of a custom touch or two to each space. With the approaching Summer months, I know our basement bathrooms will be getting a lot of use once we re-open the pool. I'll share a full tour soon, but for this post you are going to get a super easy project I was able to knock out that returned a major impact. 


Before, I had just placed a simple store bought soap dispenser in each bathroom. Scrolling through Pinterest one day looking for bathroom decor ideas, I spotted a fun soap dispenser set. That got me thinking that could be something I easily exchange out to add a little something "extra" to the bathrooms. 

Let me just tell you - I almost can't claim this as a "project" because it literally took two less than five minutes to complete. But look how adorable! 


HOW TO CREATE FARMHOUSE STYLE SOAP DISPENSERS


WHAT YOU'LL NEED

- Blank & smooth surface soap dispensers (I ordered a few sets, but used this soap dispenser set for this project, which come in a few finish options.)
- Custom labels (You can design your own with the help of Photoshop, Canva, etc. I purchased this label set and this label set from Etsy.)


- Waterproof Vinyl Sticker Paper 
- Scissors
- Desired dispenser fillers: soap, lotion, hand sanitizer, mouth washer, etc. 


INSTRUCTIONS

- Wipe off the surface of your soap dispensers. Make sure they are free of dust, crumbs, etc. 
- Print and cut out your labels.


- Carefully place label on the surface of your soap dispenser. Start at one corner and slowly smooth down the label as your go so that any bubbles can be avoided. 


- Done! Just add soap, lotion etc. 


See...SO EASY! 


I had my favorite soap and lotion on hand to complete this project. In another bathroom I used the "hand soap" and "sanitzer" labels. I love the look of them so much I've already ordered a few more dispenser sets for the remainder of my bathrooms. Even one for my kitchen sink! #cantstopwontstop


Come spend the day with us on:


Wednesday, March 3, 2021

How To Turn Ikea Curtain Panels Into Custom Looking Drapes

I've been slowly making my way through a long list of house projects that I want to accomplish and new curtains for our living room has finally been checked off the list!  When we decided to move our living room furniture into the new media room (more on that to come next week), I knew I wanted to brighten up this room a bit.  

previous living room curtains/furniture 

I loved the old curtains I had made, but they were dark and heavy, and this room doesn't get much light because of all the trees around our house so I wanted something much lighter.  I knew exactly what I wanted to do and could have purchased the fabric to make the panels, but I'd seen a few ideas floating around Pinterest of an Ikea hack and decided to order them and give it a try.  I'm SO happy I decided to go this route because I ended up with custom looking drapes for a fraction of what I would it would have cost if I made them myself and even less than if I had paid someone else to make them for me.  


When I shared on Instagram last week, I asked if anyone would be interested in a tutorial and got a lot of YES responses.  I didn't take the best pictures during the process because I was so excited to be getting them done, but I'll share as much as I can because if you can sew a straight line, you can make these, too! There are a ton of YouTube tutorials that show step-by-step exactly how to customize these panels. If you need more guidance than what I share here, you can always search for a video. 

The Ikea Ritva curtains come as a two pack in both 98 and 118 inch lengths which is great if you have high ceilings and what's even better is the price!  I got the 118 inch length pack of two for only $39!  They are called "white" on the website so I wasn't sure if they would work for me, but a lot of the reviews said they were more of a cream/off-white which is exactly what I needed.  


I debated adding lining to these because all custom drapes are lined and these do not come lined, but I opted not to line them because I really wanted the light to be able to filter through and help brighten up this room. To me what really makes them look custom is adding the velvet trim tape. They would look great alone, but I think adding the trim to them really helps make them look special!  


Because they are 118 inches long the first thing I needed to do was hem them.  The first step is to determine how long your panels need to be and then decide what size hem you would like. I went with a big 6 inch hem, but you could also do a 4 inch hem and have it look nice.  With a 6 inch hem you need 12 inches total extra length because you fold the bottom up once, then again and sew. The easiest way to hem is to fold over the bottom and iron it into place (measuring the length of the hem as you go) and then fold it again while pressing the hem and pinning into place. Lastly, just stitch a straight line across the top where you have pinned. 

bottom of the panel - 6 inch hem

The next step is to pin and sew on your trim.  I went with a 3 1/2 inch velvet trim tape, but there are SO many possibilities.  I purchased my trim at a local fabric store, but I actually found this velvet trim online, too!  I measured the length of my hemmed panels, added a little extra, and multiplied by 4 because I was going to be adding the trim on one side of all four panels.  I needed 13 yards total and it was $14.95 a yard, so not cheap, but I figure it's all about balance since the actual panels were very inexpensive! I layed out my curtains on a large flat area and decided that I wanted the trim to be placed 1 inch in from the side.  I pinned the trim in place the length of the panel (and folded it over the top and under the bottom of the panel).  Next sewing that straight line comes into place again.  Simply stitch along both sides of the trim, removing the pins as you go until the entire thing is secured.  

velvet trim pinned into place and ready to be sewn 

The last step is to add pleating hooks.  This is kind of a cheat way to achieve a pinch pleat look.  Generally, you can sew in pleating tape across the top of your panels. It has these tiny little pockets that you can slip THESE hooks into to achieve the pleated look. The wonderful thing about the Ikea curtains is that they already have pleating tape sewn in which mean one less step. They actually have three ways to hang them, but the pleating tape/hooks make them look the most structured and custom. 
 
back/top of panel with pleating hooks in place 

After slipping all of the pleating hooks into the pleating tape you are done and it is time to hang your curtains!  You'll need some curtain rings to put on your curtain rod. They make rings specifically for pleating hooks, but you don't need to spend the extra money on those because normal rings work just fine!  You just place each hook through a ring and they are secure. 

pleating hooks hanging on regular curtain rings 

This is the finished view from the front. This project is so simple and so worth it for the final look.  


If you don't know how to sew and want to do something similar, you can google "how to use iron trim tape" and see some tutorials for using THIS stuff.  It allows you to hem and add trim tape without sewing.  I'm not sure how well it holds long term, but it would definitely be worth checking out. 

Any questions? Don't hesitate to ask!

Follow us on Pinterest HERE.
Follow us on Instagram HERE.
Follow us on Facebook HERE.
Follow us on Twitter HERE. 

Monday, June 29, 2020

DIY American Flag Pallet {Tutorial}

We recently put in a fence and when all of the supplies were delivered to our house the concrete for the fence posts came on a pallet. The Mr. had the idea to turn that pallet into an American flag and I loved the idea!  I looked up a few different tutorials online and ended up with a game plan.  I love the way it turned out and happy that I finished it just in time for the 4th of July!


As promised on Instagram stories, I thought I would share a tutorial in case anyone else has access to a pallet and looking for a project!

The first step was to prep the pallet.  Our slats were spaced apart, but I decided that I liked the look of them being closer together. I started to take them off and it was taking me forever so the Mr. took over this part of the project and worked much faster than I did.  He took them off of both sides and then nailed them all onto one side closer together.


At this point I sanded it down a bit, but left it pretty rough because I liked the rustic feel of it and didn't want it to be too perfect. Next the kids and I spray painted the entire pallet white and when it dried I used painters tape to tape off where I wanted the stripes.  This obviously doesn't have the correct number of stripes as the real flag, but I wanted to use each slat as a stripe to make it easier to paint. I just made sure there was a red one on the top and at the very bottom.   


Up first were the red stripes! 


Next I adjusted the tape a bit so I could paint the blue part and left the tape on what would be the white stripes so it didn't overspray too much.


Finally I was ready for the stars. I debated several ways to do this, but ultimately ended up making my own stencil.  It was easy to do using any word processing program.  You simply open a new document, go to Insert, then Shape, and finally Star. 


I just copied and pasted the stars until I got them arranged in the pattern I wanted and printed it out. Then I used a straight edge razor and a ruler on a cutting board to cut out each star. It took forever, but was so worth it in the end! 


I taped the stencil down and used white acrylic paint with a sponge paint brush. 


I ended up having to move my stencil around after each section dried several times to get all 50 stars because I was worried about the paint smudging. I could have avoided this and painted them all at once, but that would have meant cutting out more stars.

Originally, I was going to put the flag on our screened porch, but ended up putting it down on our patio because I have so many other red, white, and blue things down there right now for summer. 


To hang it we screwed a wire picture hanger in the back. 
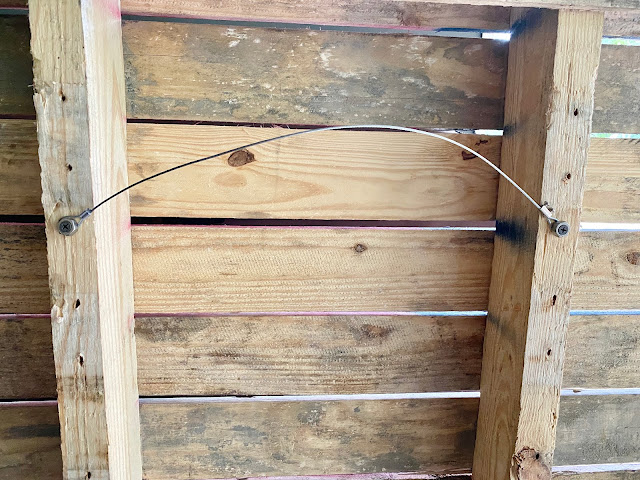


Then the Mr. found a stud, added a screw, and hung it for me! 
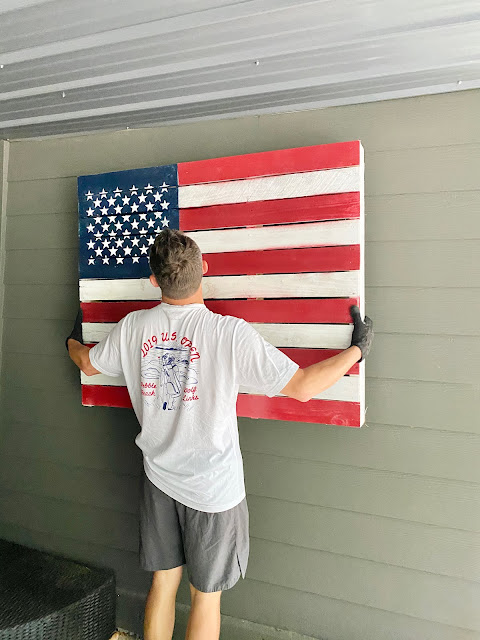


I just love the way it looks down there and I feel like it finishes off the space perfectly!  


Follow us on Pinterest HERE.
Follow us on Instagram HERE.
Follow us on Facebook HERE.
Follow us on Twitter HERE.

Thursday, May 21, 2020

How to Paint POLYWOOD Outdoor Furniture


In the anticipation of moving into our new home in a few weeks, I've been doing a lot of projects. Luckily all this quarantine business has allowed for a lot of free time to tackle my never ending list of ideas. First order of DIY business - the outdoor furniture. 


A little backstory: 

When we purchased our home we noticed the previous owners had a lot of POLYWOOD outdoor furniture surrounding the pool. We knew from experience that outdoor furniture receives a lot abuse as a result of living in the sunny South.  POLYWOOD and Trex Board tend to stand up well to both the elements and the extreme use of a family of who likes to entertain a lot outdoors. So when we were negotiating the sale we decided to ask for the furniture on a whim. 

We have a lot of outdoor furniture at our current home, but we figured we could worry about what fits best in each space when we move in. The minute I was these adirondack chair sets I knew I wanted to keep them. They were in the roughest shape of the bunch, but I had hopes I could bring them back to life. 

I waffled on the colors and what to do (one set is purple and one is orange). Everything else has a neutral base, and while I liked the vibrant purple, it didn't match the rest of our outdoor furniture or decor. I knew I didn't want to spend a ton of money to redecorate since we are in the midst of a major renovation on the interior of our home, so I came up with the idea of changing the color. 

I did a ton of research and realized a few things about POLYWOOD furniture. 
  1. You can clean it, but aren't supposed to pressure wash it. 
  2. Sanding it scratches the protective surface and voids any warranty it has. 
  3. Painting isn't recommended because that also voids the warranty. 
  4. Painting has been done, but be cautious on what to use. Also, for the long term it might not last.
So obviously I did what any sensible person would do. 

Wrong. I painted it. 

And have no regrets. 


I figured we essentially got the furniture for free so if I messed it up, no real monetary loss. I also researched if I was to paint it, what would be the most successful. 

Here's how I painted my POLYWOOD outdoor furniture, but I think this process would work for any outdoor furniture you want to transform. 


HOW TO PAINT POLYWOOD OUTDOOR FURNITURE

What You'll Need
  • Primer + Paint: Look for water based primer and paint designed for plastics. I found this Krylon ColorMaxx Spray Paint that is a primer and paint mix designed for a lot of surfaces including plastics. 
  • Cleaning Materials: A good scrub brush is a must. Use vinegar or a mold and mildew cleaner
  • Gloves 
  • Optional: Mask (to block spray paint particles) & spray paint comfort grip (trust me - worth it!)


What To Do
  • First clean your outdoor furniture. Remove all dirt, mold and mildew. The paint will adhere better to a clean surface. Let it dry for one hour. 

  • Test a spot first. I tested the underside of one piece to dip my toes in (catch that pool pun?), and let it sit for a few hours. This allowed me to confirm color, and make sure the paint would adhere.  
(Using thin coats: this is the second coat being applied.)

  • Once I was satisfied that the paint would adhere, I sprayed the whole piece and let it sit in the elements for a few days. 


  • I sprayed one light coat first, and repeated the process until I felt the furniture was well covered. (To avoid drips or obvious spray marks it's best to do really light coats rather than one or two thick ones. This will also help prevent the paint from chipping prematurely.)


Overall the process was quite easy, and I'm very happy with the results. The chairs have been through a few sunny weeks, a ton of kid use (both wet and dry), and a few rain storms and seem to be holding up well. 

| Polywood Furnture | Throw Pillows

I chose this bright aqua paint color because it looks similar to a color Polywood offers in their furniture line, and matches the pool tile well. It's the Krylon ColorMaxx Paint + Primer in Aqua. I purchased a few extra cans to have on hand in case any chips do appear over time. I also like knowing I can purchase new pieces directly to match if needed. 


Now that I've transformed the purple set, I've set my sights on the orange set. 


Here's a teeny tiny sneak peek at the color I'm going with for that set! 


This was a fun project, and I was glad I was quickly and cost effectively able to update our outdoor furniture. And now - time to sit back, relax, and enjoy it! 


Come spend the day with us on:
Instagram | Pinterest | Facebook | Twitter |


Related Posts

Related Posts Plugin for WordPress, Blogger...