Showing posts with label desserts. Show all posts

Wednesday, December 13, 2017

Kitchen Confessions: Gingerbread Trifle


The  holidays are the one time of year I get excited about actually being in the kitchen. There are so many yummy treats and warm comforting foods to make. Top of the list is gingerbread! It just makes the house smell SO GOOD! Not to mention it tastes all sorts of yummy. 

Today, I'm chatting over on Savvy Sassy Moms about one of my favorite holiday desserts - Gingerbread Trifle

Quick and easy holiday dessert recipe. Gingerbread Trifle recipe that is easy to make, and is the perfect holiday dessert.

It is super easy to make (because if you know me by now, I am all about the easy), and doesn't take much prep time at all. It's a total crowd pleaser, and travels well if you have to bring a dessert to a holiday party or travel on the holidays.


In just a few quick steps the Gingerbread Trifle is ready to go and ready to serve! 


What are some of your favorite holiday dessert recipes? Do you have a favorite you like to make this time of year? Share with us!


Follow us on Pinterest HERE.
Follow us on Instagram HERE.
Follow us on Facebook HERE.
Follow us on Twitter HERE.

Tuesday, November 7, 2017

Kitchen Confessions: The Cheesecake Factory At Home Mixes


We love The Cheesecake Factory around here. It's probably, hands down, one of my all-time favorite restaurants. It's not somewhere we got on just a regular day and it is more of a special occasion spot, making it even more special.  My girls love it also!  Last winter we had a girls night out with Jen and her girls complete with shopping and a delicious dinner and dessert at The Cheesecake Factory.


Little Mama loves it so much and thinks that it is so special that she picked that for her birthday lunch with friends when she turned 10 this summer.  Those girls were so fun to watch as they admired all of the amazing cheesecakes in the case and trying to narrow down which ones to share.


Now, while I love their cheesecakes, y'all know us Magnolia Mamas are all about simple and easy when it comes to the kitchen  so there is probably a very slim chance I would ever try to create a cheesecake at home...until now!

The Cheesecake Factory can't share their special ingredients that make their cheesecakes the very best, but now they have created boxed mixes inspired by their legendary cheesecakes.  The Cheesecake Factory At Home Cheesecake Mixes come in several different flavors including Classic, Strawberry and my personal favorite, Salted Caramel.


I don't know about your children, but mine had a blast on Halloween.  In fact, they each brought home so much candy from trick-or-treating that I was thinking there was no way in the world we would ever eat it all!


Looking at all that candy got me thinking.  The Cheesecake Factory At Home Cheesecake Mixes work great alone or when you put your own twist on them, so an idea popped in my head for a Snickers Salted Caramel Cheesecake.  That just sounds fancy, doesn't it?!  Let me tell you, not only does it sound fancy, but it taste pretty fancy also!


The best part of it was that the entire process was so simple thanks to the mix!  The graham cracker crust was in a small package and all I had to do was combine it with melted butter and press into a pan. 


Next I followed the directions on the box for making the actual cheesecake portion and after that was done I stirred in chopped Snickers.  


Then it was ready to bake!  So very simple. 


The results, well, they were amazing.  The Mr. couldn't believe I had made this at home and the kids loved it, too!  There is one piece left and I have already placed my claim on it for an after dinner dessert tonight. 


This yummy Snickers Salted Caramel combo got me thinking about all of the other variations that could be made using The Cheesecake Factory At Home Mixes.  The Halloween candy alone had enough variety to make the possibilities endless.  I'm thinking Twix, Milky Way and Heath Bar would go great with the Salted Caramel mix and Reese's or Butterfingers would be a yummy addition to the Classic mix.  Honestly, I don't think you can go wrong with any of them and I'm just happy I now have a way to put some of the candy to good use!  

Follow us on Pinterest HERE.
Follow us on Instagram HERE.
Follow us on Facebook HERE.
Follow us on Twitter HERE.

Tuesday, October 10, 2017

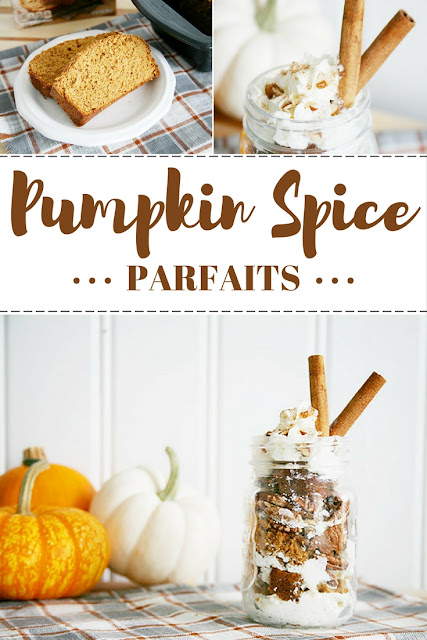
Kitchen Confessions: Pumpkin Spice Parfait

Everywhere we look we see pumpkin. And we're okay with that. Because we are all....


We are most definitely all about the pumpkin everything. Pumpkin is one of our favorite flavors, and not just in the Fall. We love pumpkin year round, but it's so nice that this time of year pumpkins are in season and we can enjoy it even more.

The moment it turned Fall-ish (and because it is the South I'm totally going off the calendar and not the weather because today it's 90 degrees!), we dusted off our cookbooks and bookmarked some of our favorite pumpkin recipes to put on our menu.  From appetizers to delicious desserts the pumpkin options are endless!


I love love love the yummy pumpkin bread recipe Carrie Beth shared last year. I've been majorly craving it for months, but haven't had the time to make it. Sometimes I just need something quick and easy to satisfy pumpkin craving. I stumbled upon these Krusteaz baking mixes and let's just say we are slightly addicted.


They are so yummy! I love that they only require a few ingredients, and they are usually things I already have on hand. I can make a quick and yummy dessert that everyone loves with very little effort. Now that's my kind of pumpkin everything!


Over the weekend I needed a dessert for a dinner, but with sports and other activities didn't have a lot of time to make something extravagant. After doing a little brainstorming I came up with these easy Pumpkin Spice Parfaits.


Because I already had some Krusteaz Pumpkin Spice Quick Bread on hand it cut my prep time down to nothing. Not to mention so. much. YUM!!

If you want a little pumpkin spice fix, or need a quick dessert option for the upcoming holidays this is definitely a recipe to put on your radar.

Pumpkin Spice Parfait Recipe. So easy and so yummy! Can make in just a few simple steps! Great dessert for fall and holiday parties.

PUMPKIN SPICE PARFAIT

Serves 6-8
Total Time: 1 hour

Ingredients
  • 1 box of Krusteaz Pumpkin Spice Quick Bread
  • 10 oz of heavy whipping cream
  • 2 cups of chopped pecans
  • 1 can of whipped cream
  • 1 tbsp of cinnamon and sugar
  • Optional: cinnamon stick for garnish


Instructions
  1. Bake Kruzteaz Quick Bread according to instructions. 
  2. Let bread cool then slice and set aside. 
  3. In a trifle dish or individual serving pieces (we love to use mason jars!) spread the bottom with a small amount of heavy whipping cream as your base layer. 
  4. Break slices of the bread into large pieces and layer over the whipping cream. Then layer with whipping cream, pecans, and bread. Repeat until filled to the top. 
  5. Top off with whipped cream. Sprinkle lightly with the cinnamon/sugar mixture and a few pecan crumbles.
  6. Garnish with cinnamon stick. Serve and enjoy!


Note: Might also taste yummy garnished with drizzled caramel or butterscotch chips!

Such an easy - yet yummy - dessert! I love that the quick bread mix was able to help me in a pinch, and I know it will be a favorite of ours all season. 

We want it to be a favorite of yours too! We are partnering with Krusteaz and giving one lucky reader the chance to win a fun Pumpkin Spice kit of their own. Enter below and the winner will be announced on Friday, October 20th.


a Rafflecopter giveaway


What is your favorite pumpkin recipe to make during the Fall? 

Jen

Follow us on Pinterest HERE.
Follow us on Instagram HERE.
Follow us on Facebook HERE
Follow us on Twitter HERE

*Winner will be chosen randomly. Winner must be 18 and up, and a resident of the United States. Winner must respond with in 48 hours or a new winner will be chosen. All prizes will be sent to the winner directly from the brand. 

** We received this product from Krusteaz for review, but all thoughts and life changing opinions are our own. 

Wednesday, August 2, 2017

Pineapple Twinkie Pops


It's the start of August and we can't believe it! The summer has flown by! Today officially 4 of our 6 Mini Magnolias have headed back to school. While we love school, the carefree days of summer are where our hearts lie. We couldn't go back to school without having at least one last summer soiree, and we celebrated with a little pineapple party (more to come on this soon). And what kind of party would it be without a yummy pineapple themed treat or two?  I introduce to you Pineapple Twinkie Pops.


Yum, right?


These Pineapple Twinkie Pops were a huge crowd pleaser, and were a cinch to make. Within just a matter of minutes the pops were complete,  and it was a simple enough process that we were able to get the kids involved. They have an absolute blast anytime they can help in the kitchen, and jumped at the chance when they saw yummy cake treats and sprinkles were involved. They loved making these Pineapple Twinkie Pops, and getting the chance to put their own little touches on each one.


The key ingredient to these pops are these new Twinkies we spotted. They have a ton of fun new flavors - chocolate, fudge covered, Cotton Candy - and since the pops are cake based they made for the perfect "cheat" to the traditional cake pop. No-bake treats are kind of like summer...they will always have our hearts.


HOW TO MAKE YOUR OWN PINEAPPLE TWINKIE POPS

What you will need: 
  • 1 box of chocolate Twinkies
  • 2 bags of yellow candy melts
  • 1 bag of green candy melts
  • 10 treat sticks
  • Clear or white sprinkles
  • Parchment or wax paper
  • Optional: paper straws

What to do: 
  • Unwrap Twinkies and set aside. 
  • Place yellow candy melts in a microwavable bowl. Heat in microwave for 30 seconds on half power. Stir. Repeat until melted creamy smooth. 
  • Take one chocolate Twinkie and dip into yellow chocolate until fully covered. Lay on parchment paper to cool and insert treat stick into one end. Repeat until all Twinkies are covered. 
  •  Place green candy melts into a microwavable bowl. Heat in microwave for 30 seconds on half power. Stir. Repeat until melted creamy smooth. 
  • Lightly drizzle green chocolate back and forth onto the yellow covered Twinkie pop. 
  • Spread sprinkles on top of each Twinkie Pop before it becomes fully cooled.
  • Let cool for approximately 20 minutes or until chocolate is hardened to the touch. 
  • Cut a paper straw in half and slide over treat stick and gently insert into the cake pop. 
  • Serve  and enjoy! 
Party like a pineapple! Pineapple themed cake pops! #twistontwinkies #ad

Added bonus: We froze some of the Pineapple Twinkie Pops and they were even more amazing! The perfect treat for these hot summer days!

To learn more about the new Twist on Twinkies, check out the Hostess Snacks Facebook page and for more fun Twinkie inspired recipes check out #TwistonTwinkies


Follow us on Pinterest HERE.
Follow us on Instagram HERE.
Follow us on Facebook HERE
Follow us on Twitter HERE


No bake pineapple themed Twinkie cake pops. Fun for a pineapple themed party! The perfect treat to let kids get creative in the kitchen and help bake.


Monday, July 24, 2017

Kitchen Confessions: Shark Week Snack {Shark Bark}

We love themes around here.  Doesn't matter if it is for a major holiday, a made-up one, or just a week surrounding our boy's favorite ocean animal.  Theme wear, themed decorations and theme snacks make celebrating, no matter what the occasion, more fun!  


It's shark week and the kids had so much fun helping us create this delicious shark bark to snack on all week. 
  

Bark recipes are some of our favorites because they are so dang simple!  Some melted chocolate, some sprinkles and toppings and it is done. That is our kind of recipe. It looks colorful and cute and our taste testers always approve of this yummy sweet treat.  We're sharing the details of this shark bark over on Savvy Sassy Moms today so be sure to head over and check it out!


Jen & Carrie Beth 


Follow us on Pinterest HERE.
Follow us on Instagram HERE.
Follow us on Facebook HERE.
Follow us on Twitter HERE.

Monday, February 20, 2017

Cocktail Confessions: Baking With Booze

February has proven to be such a fun month so far. Typically it's a quieter month for us, but this year we've been taking our New Year's goal to heart and have seriously been consolidating down on our schedules. This has freed us up to do a lot more fun things, including entertain more!

As you know, we love us a good cocktail when we entertain. But here's my little confession for today - sometimes I like to mix a little booze with my baking.

Sneaky...yes.

Delicious? Absolutely!

{Photo Credit: Delights by Dawn}

When I came across this super yummy Dutch Caramel Vodka Bites recipe from Atlanta native and baker extraordinaire, Dawn from Delights by Dawn, I just had to give it a whirl on my own. Dawn makes the absolute best treats, and her speciality is infusing alcohol into decadent desserts. If you are local you might have been lucky enough to taste one of her treats when you've attended an event at the Georgia Dome or Phillips Arena. (If you aren't local - no worries - you are able to order all of Dawn's delights online too!)


My mouth was watering for caramel bites the moment I read about them, and I was equally excited to that the recipe called for one of my favorite infused flavors of vodka - caramel! Van Gogh Vodka has an awesome variety of flavored vodkas and the Dutch Caramel is one of my favorites (It's like dessert in a glass!).


It such a delicious flavor in cocktails that I couldn't wait to see how it would be used to create a fabulous tasting dessert.


After putting together the quick and easy recipe that Dawn provided we were smitten upon the first taste. These Dutch Caramel bites are are dangerous in such a good way! The combined flavors create such a decadent taste and we had to stop ourselves at just one or two because - eat responsibly. ;) But we could have easily gone through the whole batch!

Try them for yourselves!


DUTCH CARAMEL VODKA BITES

Ingredients

  • 1 12oz pkg of vanilla wafers
  • 3/4 cups of confectioners sugar
  • 2 1/2 tablespoons of light corn syrup
  • 1/2 cup of Van Gogh Dutch Caramel Vodka
  • 7oz of melting chocolate (dark or milk)
  • wax or parchment paper
  • Optional: Sprinkles or other desired topping

Directions

  1. Put vanilla wafers in a food processor and process until fine. (If you don't have a food processor available, stick vanilla wafer in a large ziplock bag and roll with a rolling pin until fine in texture.)
  2. Place crushed wafers in a bowl and mix with sugar, corn syrup, and vodka. Mix until well combined. 
  3. Using a small cookie scoop, or heaping tablespoon, scoop a ball of your wafer dough into a ball and place on wax paper. 
  4. Melt the chocolate according to the package. (We always choose to melt in the microwave at 50% in 30 second increments. We stir in between each heating and repeat until smooth.)
  5. With a fork dip the bites into the chocolate until covered and then place back on the wax paper. 
  6. Place sprinkles or garnish on top before chocolate cools. 
  7. Let cool or place in an airtight container in the refrigerator until ready to serve. 
  8. Enjoy!

Note: Dawn suggests for the best possible taste to let these sit for a day or two before serving. This allows the flavors to truly combine for an even more delightful treat. 


Do you bake with booze? Share with us some of your favorite boozy desserts!

 photo jensig.png

Follow us on Pinterest HERE.
Follow us on Instagram HERE.
Follow us on Facebook HERE
Follow us on Twitter HERE


**Some of these products were provided by Van Gogh Vodkas in exchange for a review. All thoughts and opinions are our own. **


Tuesday, June 21, 2016

Kitchen Confessions: Coconut Peanut Butter Bars


Coconut. Peanut butter. Chocolate. 

Need I say more? 

I'm not one to turn down a sweet treat, and most definitely not a sweet no-bake treat. These little squares of yummy are about to blow your mind.  


I found this yummy recipe a few weeks ago, when I was looking for an easy dairy-free dessert, and we cannot stop eating them. Literally the second I make a batch they are gone!

 The moment I saw coconut I was in love - its a serious addition people. But once I read these no-bake bars were also gluten-free, and refined sugar free I was all in. 

We've given them quite the test run - rumor is I might have eaten it as breakfast one day (hey, it's healthier than a donut). I even made a few batches at the beach. Listen, if I am going to bake (or no-bake) on vacation, you know it has got to be tasty. 

These Coconut Peanut Butter Bars are super easy to make and I promise you will be thanking me every sweet bite you take. 


Ingredients:
  • 1 cup of old fashioned oats (gluten-free)
  • 1 cup of unsweetened, shredded coconut
  • 1/4 cup of almond meal
  • 3/4 cup of natural creamy peanut butter
  • 1/2 cup of honey
  • 1/4 tsp of salt
  • 1 tsp of vanilla 
For the topping: 
  • 1/4 cup of chocolate chips
  • 1 tablespoon of peanut butter
** For the refined sugar free topping use:
  •  1/4 cup of unsweetened chocolate chips, chopped
  • 1 tablespoon of peanut butter
  • 1-2 tablespoons of honey


Instructions:

For the bars: 

  1. In a small bowl mix coconut, almond meal, and oats. Set aside.
  2. In a large, microwave safe bowl gently melt peanut butter and honey together until smooth. Microwave in 30 second intervals, stirring in between. 
  3. Add vanilla and salt. 
  4. Add the dry ingredients and mix together. 
  5. Spread into an 8x8 pan. 

For the topping & putting it all together: 
  1. Melt the peanut butter and chocolate in a microwave safe bowl. Microwave in 30 second intervals, stirring in between. Cook until chocolate is melted and smooth.
  2. Drizzle and spread the topping mixture over the bar mixture. 
  3. Set aside to cool until hard. (Place in refrigerator to cool faster.


Then it's time to serve and enjoy!

Make sure to store any leftovers in the refrigerator so that they don't "melt". 
I have yet to make it to this stage. 
#goals #willpower


Let me know how you like this yummy no bake treat!
Or do you have a favorite no bake recipe that I need to try - sharing is caring! 

 photo jensig.png

Follow us on Pinterest HERE.
Follow us on Instagram HERE.
Follow us on Facebook HERE
Follow us on Twitter HERE

Related Posts

Related Posts Plugin for WordPress, Blogger...